Superio Document
  • Installation
    • Hosting Requirements
    • What’s included
    • Installation System
    • Updating System
  • Create Menu
  • Settings
    • General Settings
    • Contact Settings
    • Candidate Settings
    • Job Settings
    • News Settings
    • User Settings
    • Styling Settings
    • Advance Settings
    • Email Settings
  • Home page
    • Using Templates
    • Build Home Page
    • Contact Manager
  • Superio Elements
    • Hero banner
    • Job Category
    • Job List
    • Brand List
    • About us
    • Block Counter
    • App Download
    • How it works
    • Candidate list
    • Pricing table
    • News List item
    • List Featured Item
    • List Location
    • Call to Action
    • List Testimonial
    • Text
    • FAQ's Block
  • Company Manager
    • Company Listing
    • Creating Company
    • Attributes
  • Job Manager
    • Job Listing
    • Creating Job
    • Job Type
  • Skill
  • All Applicants
  • Candidate Manager
    • Candidate Listing
    • Creating Candidate
  • Category
  • GIGs Manager
    • GIGs Listing
    • Creating GIG from Admin
  • Candidate Dashboad
    • Candidate Register
    • Candidate profile
    • Creating your Gig
    • My Apllied
    • My Contact
    • Start selling the GIG
  • Employer Dashboard
    • Employer Dashboard
    • Company Modify
    • Job Listing
    • Your Applicants
  • Location
    • Location management
  • News
    • Creating News
    • News Listing
  • User Manager
    • Create new User
    • Roles Manager
  • Language Settings
    • Language
    • Translations
    • Multi-language
  • Change Log
  • Thank You!
  • Superio Doc
    • Docs »
    • I need help!!

      Server Requirements

      The Laravel framework has a few system requirements. All of these requirements are satisfied by the Laravel Homestead virtual machine, so it's highly recommended that you use Homestead as your local Laravel development environment.

      However, if you are not using Homestead, you will need to make sure your server meets the following requirements:

      • Check PHP version, ensure that you are using the PHP7.3 or newest
      • MySQL 5.8 or higher
      • BCMath PHP Extension
      • Ctype PHP Extension
      • https://kms.bookingcore.org/tickets
      • JSON PHP Extension
      • Mbstring PHP Extension
      • OpenSSL PHP Extension
      • PDO PHP Extension
      • Tokenizer PHP Extension
      • XML PHP Extension

      Minimum server space and RAM or processor, or resources are required on the hosting plan: RAM 2G, 1 CPU, 10GB Disk

        What’s included

        When purchasing Superio from Codecanyon, you will be able to download Superio files with your Envato account. There will be two packages for you to choose: The Main Files contains all files, or the Installable Superio files with just necessary installable Superio files.

        If you choose Main Files, there will be an Superio Folder included:

        • Superio Folder – contains the superio.zip
        • Documentation Folder – contains the Document for system
        • Licensing Folder – contains the licensing files. (This is your purchase code that you need to download from codecanyon).

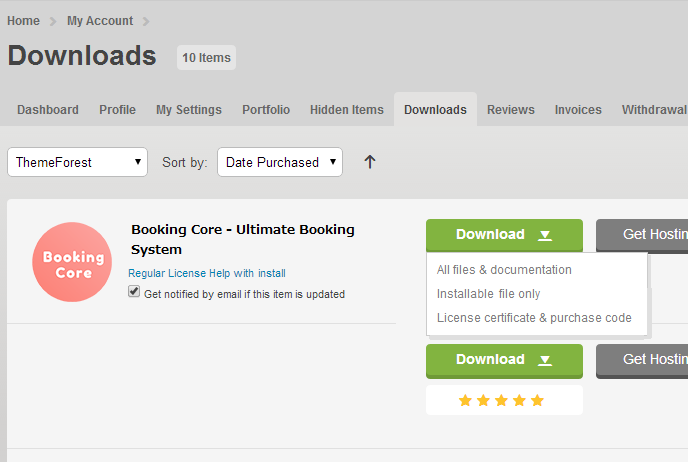
        To find your licence key/purchase code you need to log into your Codecanyon account and go to your “Downloads” page.

        Locate some of the premium Script you purchased in your “Downloads” list and click on the Download and next on the “License Certificate&purchase code” link in drop-down menu.
        Installation System

        Some notes before installation:

        1. Check PHP version, ensure that you are using the PHP7.3 or newest
        2. Prepare the superio.zip to upload to server
        3. Do install the script by the link


        Administrator: [email protected] / Pass: admin123

        Employer: [email protected]/ Pass: 123456

        Candidate: [email protected] /Pass: 123456


        Follow the steps below to install Superio system .

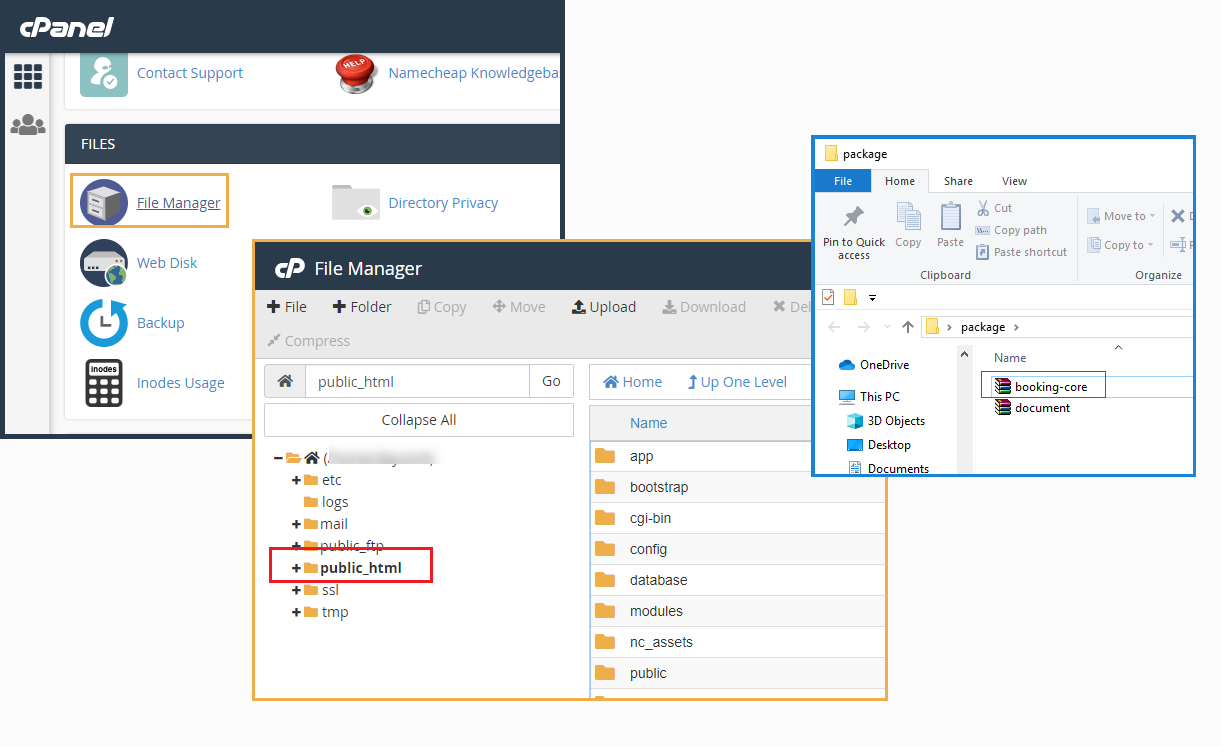
        Step 1 – Unzip the downloaded package from Codecanyon. Find the folder Superio and inside it find the file superio.zip inside it.

        Step 2 – Upload superio.zip to your hosting and UNZIP file.

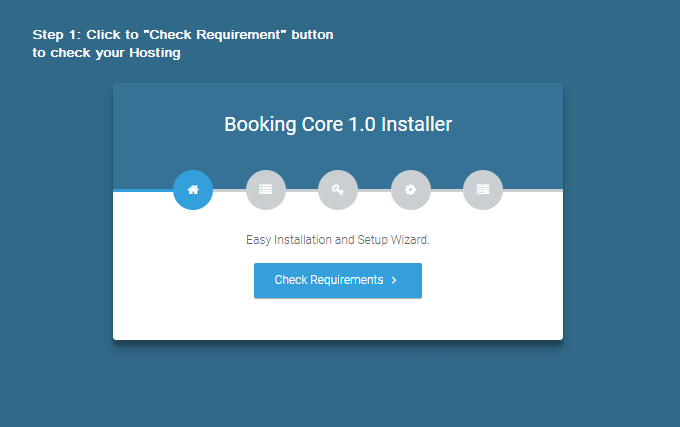
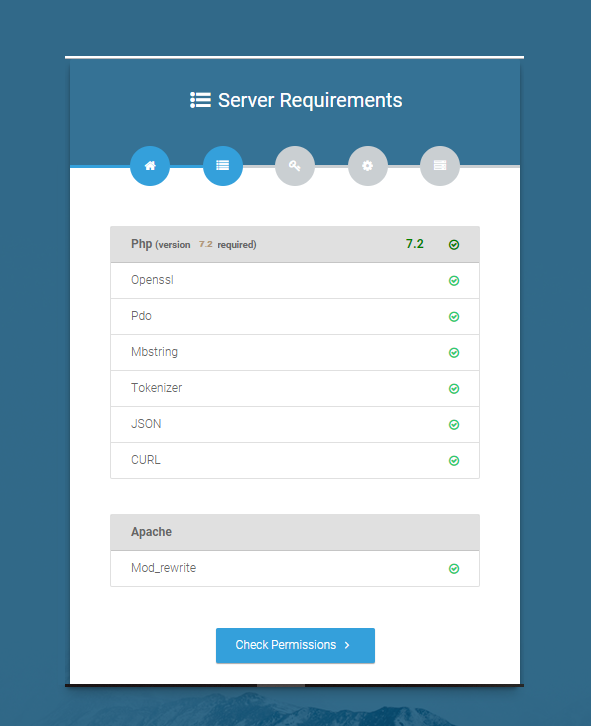
        Step 3: – Open Browser with link URL: http://linkURL.com/install then Follow the panel to Install the Booking System

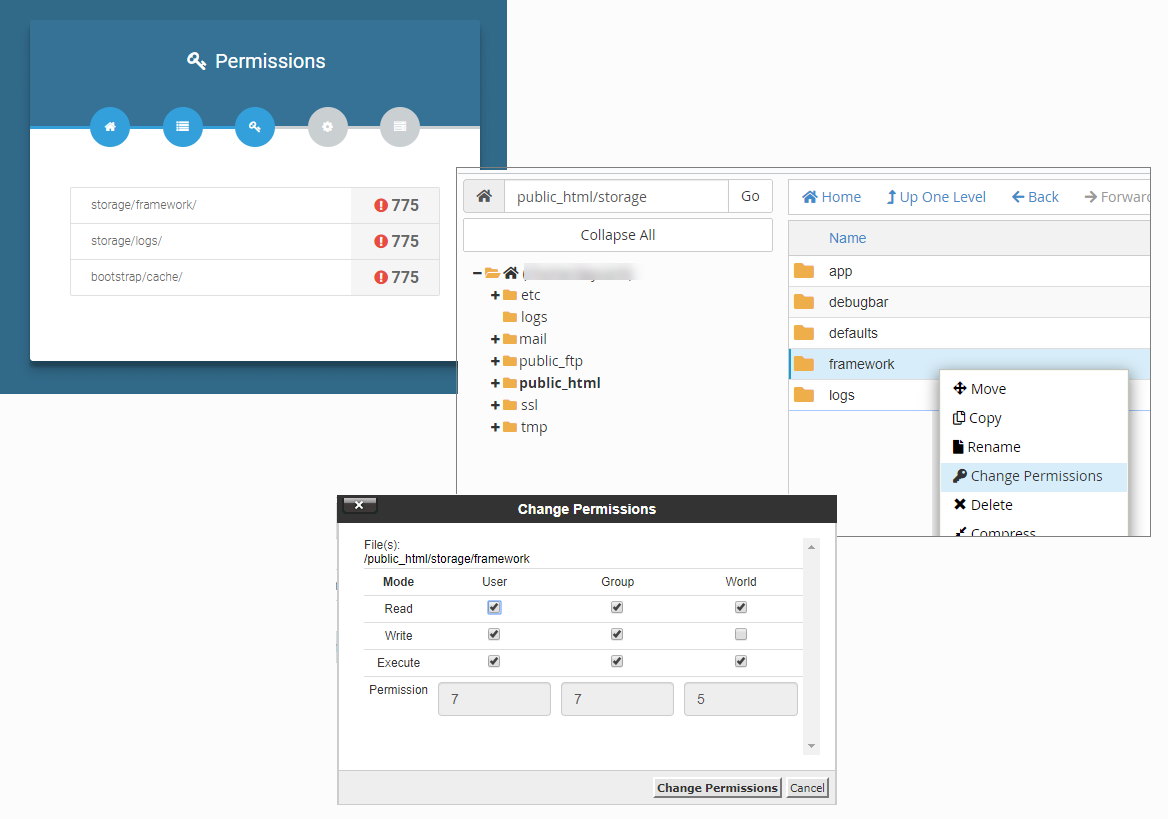
        This is some Serve information that is required for Booking System, please contact to your Supporter if the system is failed

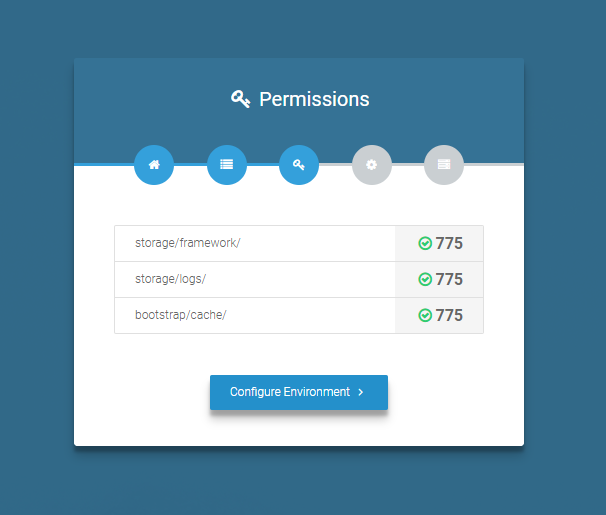
        And Folder permission need to be set is 775

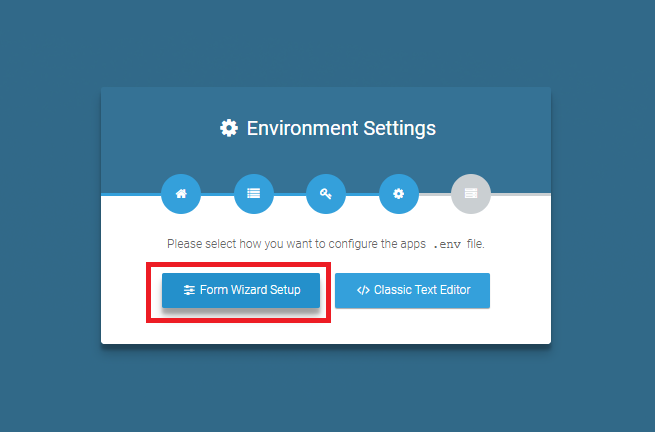
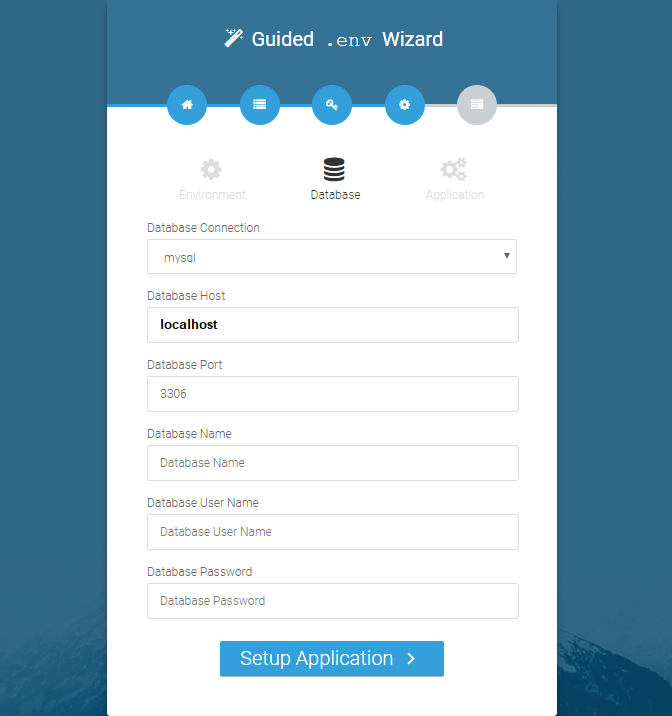
        After checking all information, we start to install System, Click to Form Wizard Setup button to Open Setting Panel

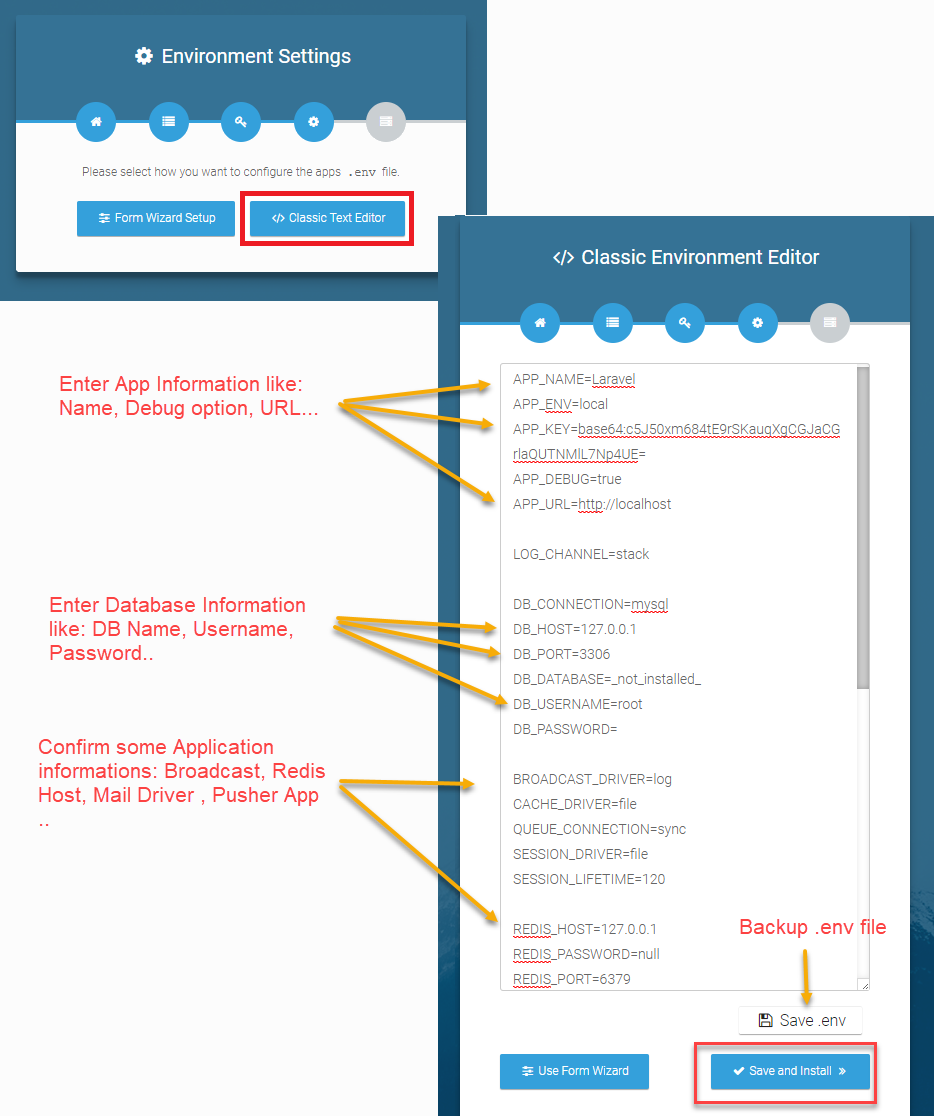
        Continue entering some your hosting information like: DB host, DB Post, DB Name, User of DB and Password then press Setup Application button to next to Application Step Or Edit .env file for install DB


        Or try with Classic Text Editor

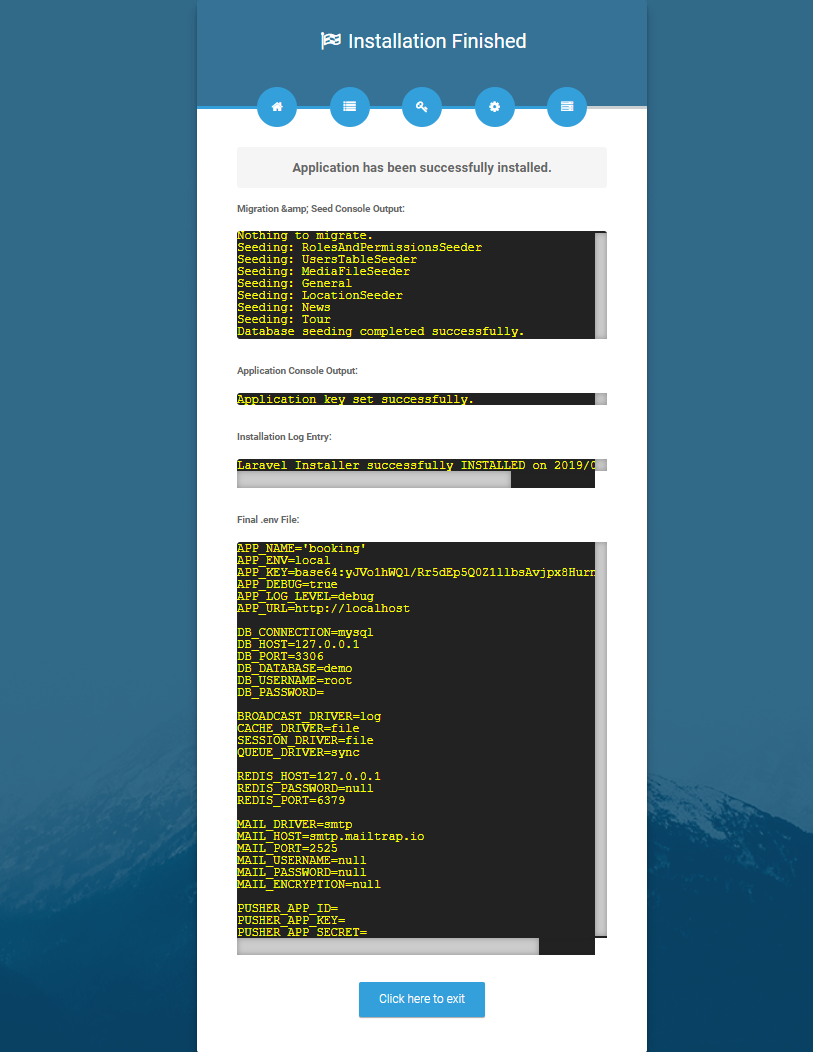
        This is Installation Finished panel:


        Finally, Log into your Site account by typing YOURDOMAIN.com/admin, replacing "YOURDOMAIN" with the actual domain you own.

        Administrator: [email protected] / Pass: admin123

        Employer: [email protected]/ Pass: 123456

        Candidate: [email protected] /Pass: 123456

        Update System version

        Important steps: Backup your all files & Database and : On the Update case, there are 2 things in your hosting need to be carefully:

        * .env is DB information file

        * All php files in your hosting

        * Database: in this version there are many things is changed,If the update process is successful, all the old data will be preserved, but in case of unwanted events, you need to backup your db as well.

        * /uploads folder: all the files and images is saved here, please carefully with this folder

        Note: Remember to backup files on your hosting.

        Create Menu

        Create normal Menu:

        To Setup A New Menu, Follow The Steps Below.

        Step 1 : Navigate to Dashboard > Menus section of your admin.

        Step 2 : Click the “Create A New Menu” link to make a new menu. Enter the name then hit the “Create Menu” button.

        Step 3 : To add a menu item, select one of your created pages on the left hand side and click “Add to Menu”. You can also add all kinds of different posts from the left side.

        Step 4 : To add a custom menu item, enter a custom name and link into the “Links” box.

        Step 5 : Manage your menus by using the drag and drop functionality. To create a dropdown menu, simply drag a menu item below and slightly to the right of another menu item and it will lock into place and create a dropdown section.

        Step 6 : After setting up your menu, scroll down to the bottom of the page to assign Primary Navigation .

        Step 7 : Once its all done, make sure you click the “Save” button.

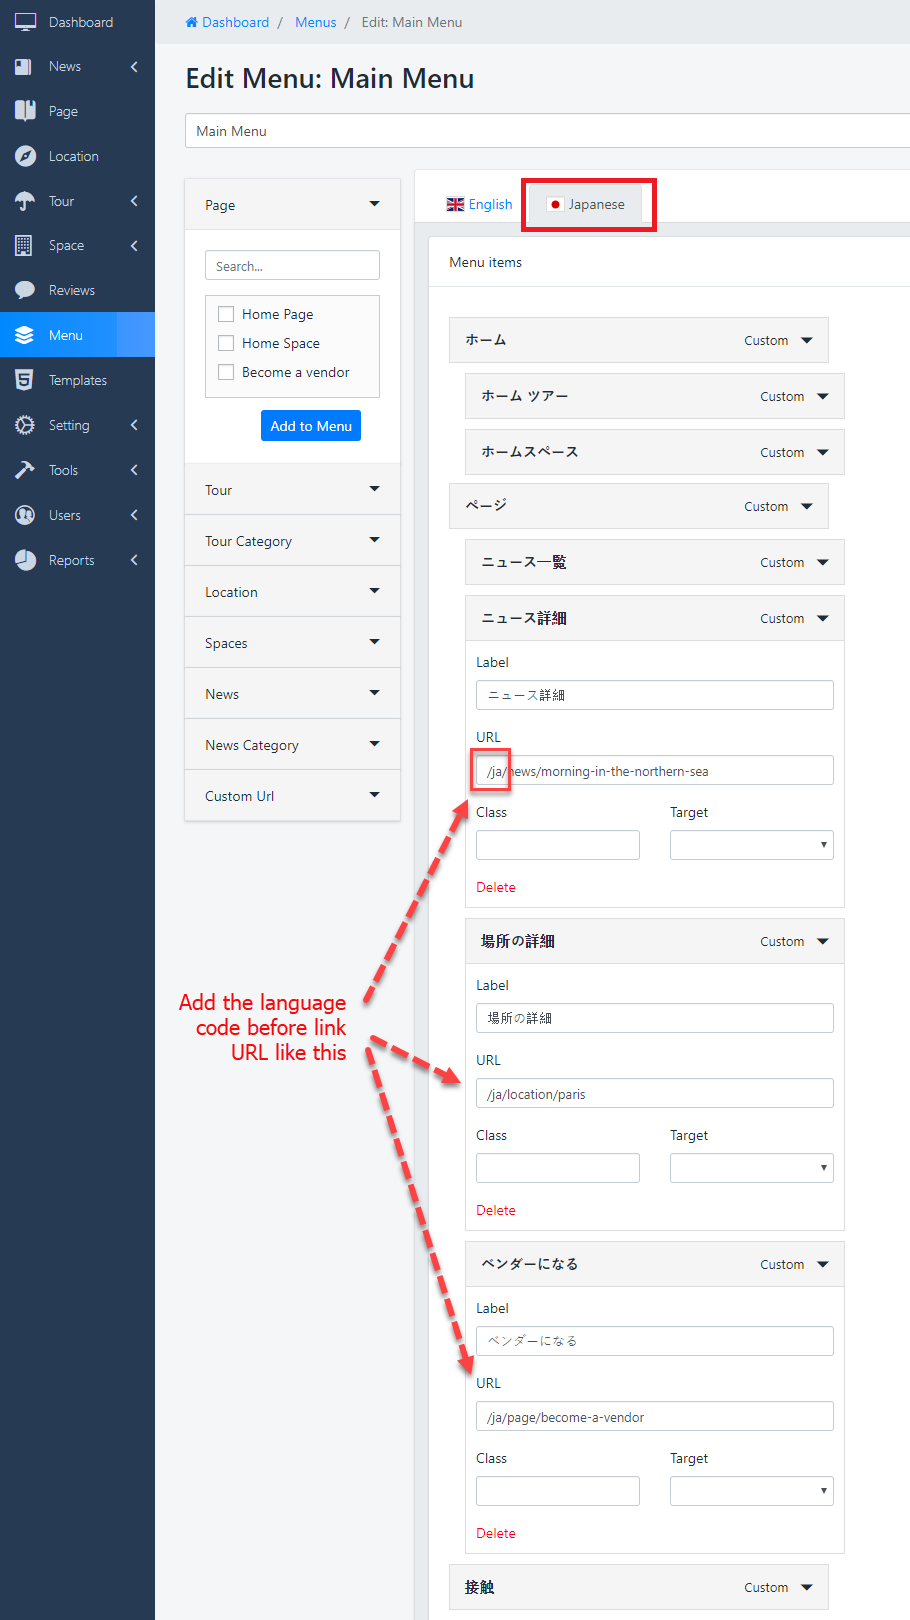
        Add link for Multi-language of Menu:

        Navigate to other languages then add the code of language to link, see the image below:

        General Options

        1. General Settings:

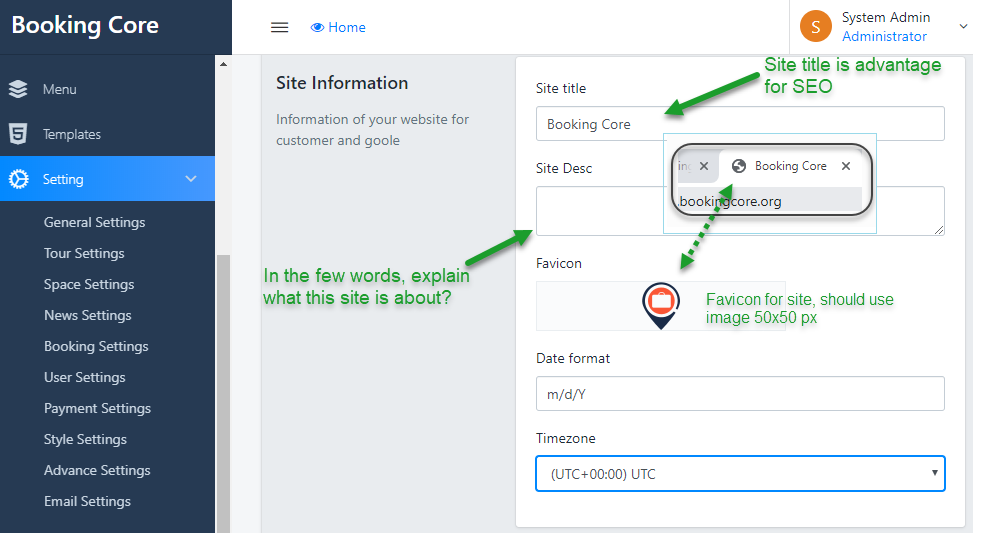
        –  Site Information: Allow you to upload logo for your site on Top Header

        - Date Format: Enter the Date format that fit your Country

        Here we formatted the date with 'j M Y H:i:s A e' so it gives

        • j – Day of the month without leading zeros ( 1 to 31 )
        • M – A short textual representation of a month, three letters ( Jan through Dec )
        • Y – A full numeric representation of a year, 4 digits ( Examples: 1999 or 2003 )
        • H:i:s – Hours, minutes and seconds
        • A – AM / PM
        • e – Time zone ( default UTC )

        Or read more here


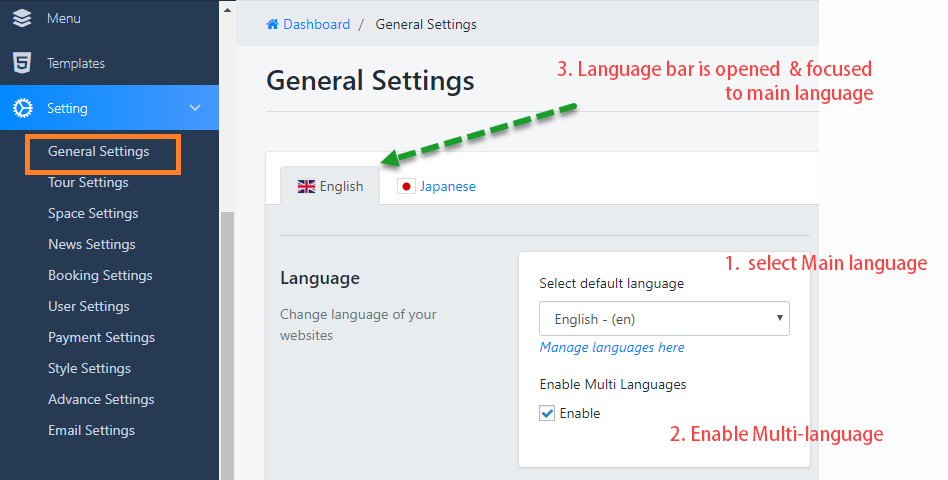
        –  Language: Select the language that you want to use on Site, default English.


        –  HomePage: Select the page that you want to set it as Home Page


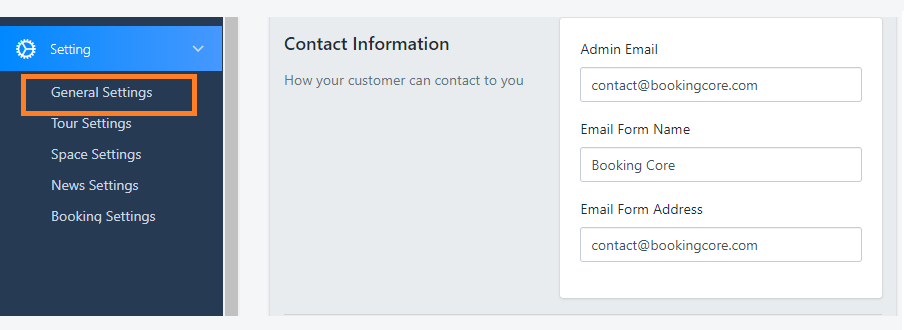
        –  Contact Information: This address is used for admin purposes. Clients will contact you via this email address

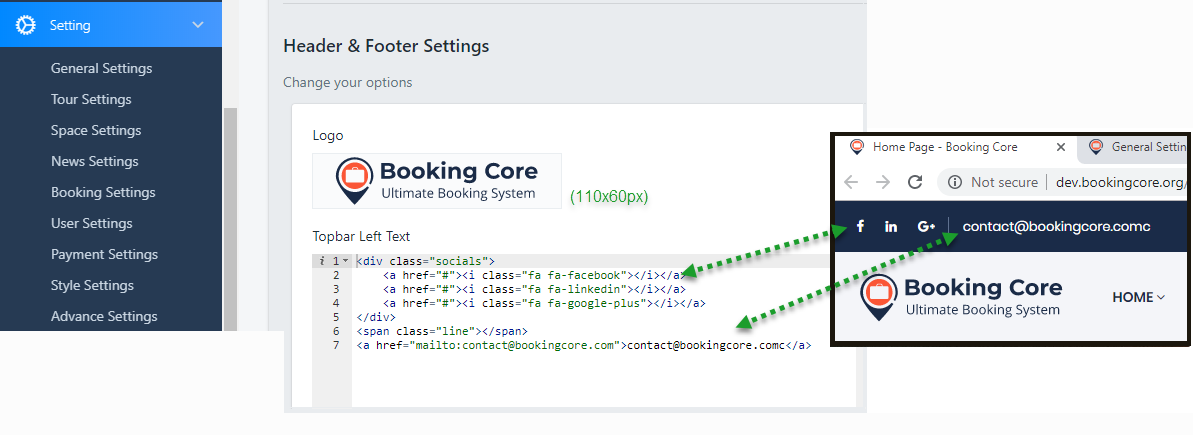
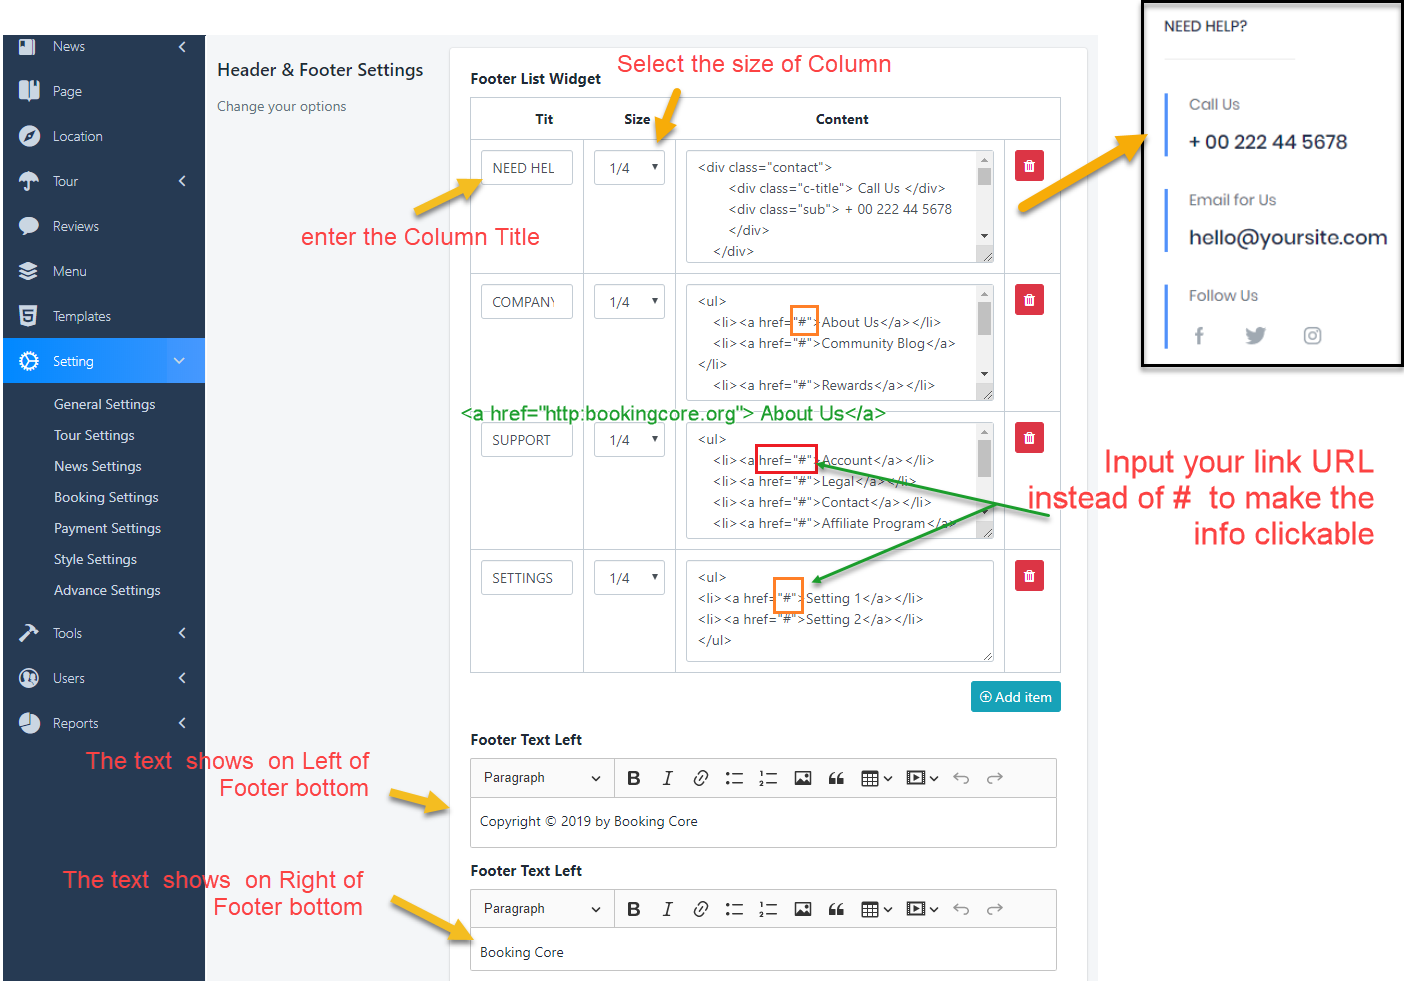
        2. Header and Footer Settings

        – Header Settings: Enter your information to change the Default infor


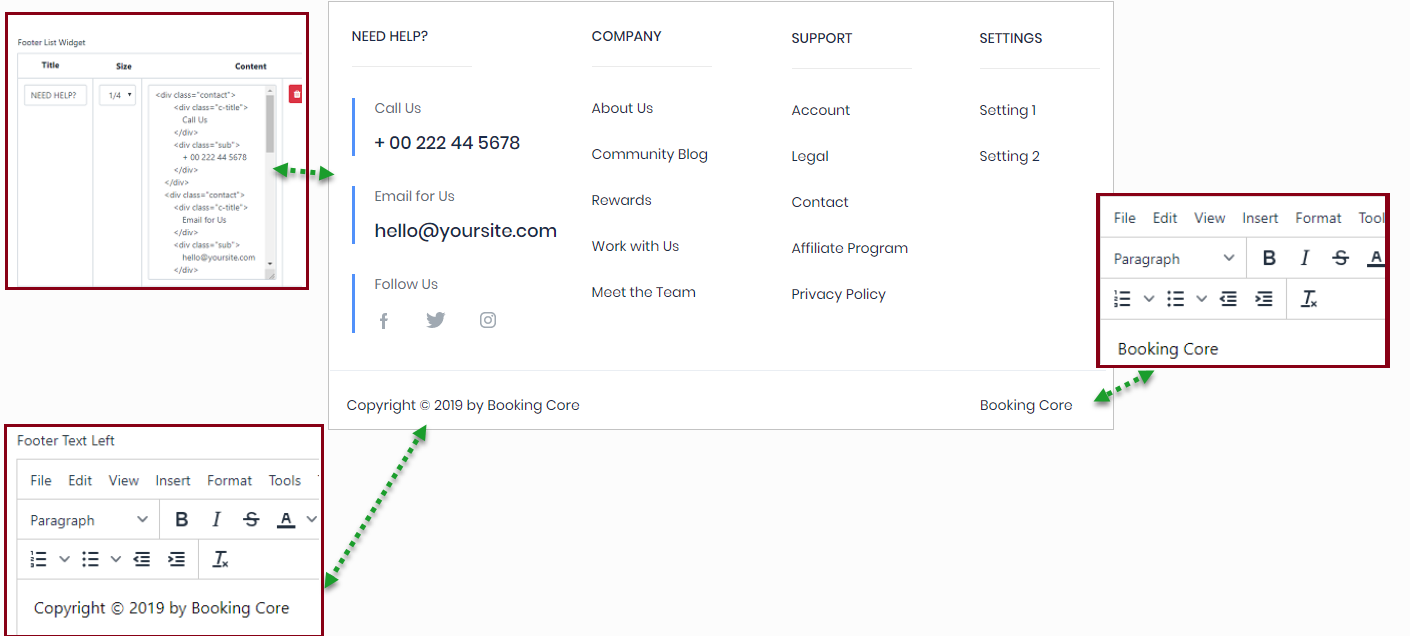
        – Footer Settings: Include Footer section and Footer bottoms

        Default: there are 4 columns with size Col-3, just need to change the Content of each column, or change the number of column by the way you want

        You can use HTML code on each column, that makes your information look nicer


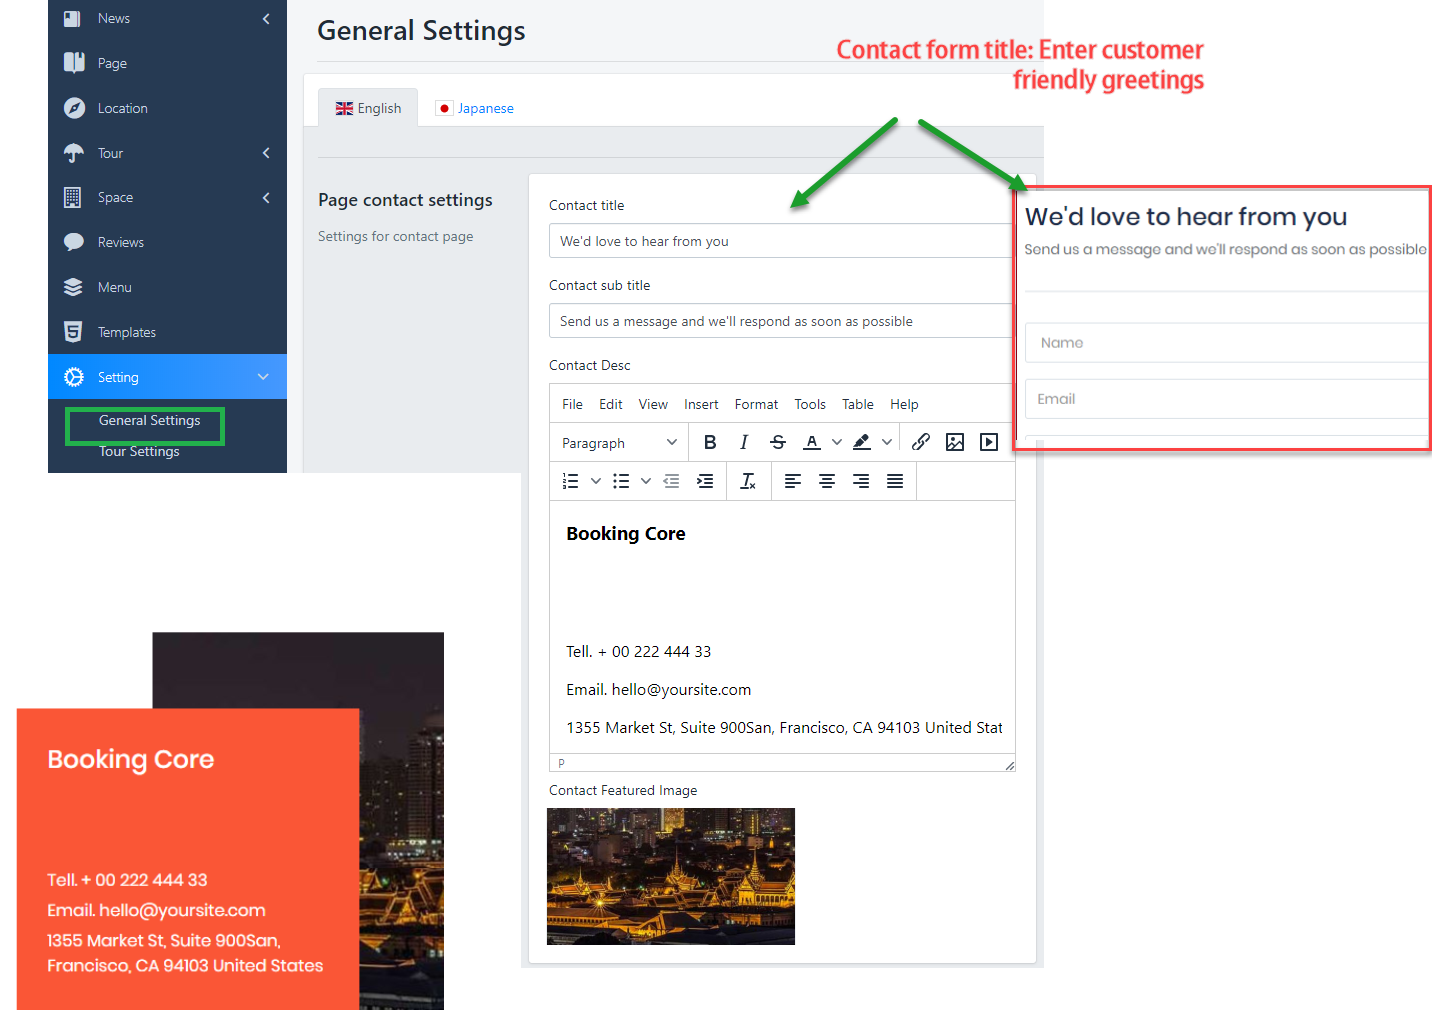
        Page contact settings

        Contact layout

        Navigate to Dashboard > General > Page contact settings:

        There are 2 parts need to do config:

        1. Contact setting include map, address
        2. Call action settings

        Contact settings

        Enter content for contact here, some personal information you may change:

        List contact: you need to input Title, Description, and Icon image(size 51x51)

        We are using svg images to make icons, you can use png images of the same size

        Description field: You can input content desciption or simple HTML code here

        - With the phone number, you can use href="tel:99999"

        - With the mail, you can use href="mailto:[email protected]"

        Press to "Add new" button if you need to add new field information

        Iframe google map:

        - To get this iframe, you need to go to http://map.google.com/

        - Then input your address, you will see the share button

        Call action settings

        You need to input the Title, content, and Recruiting button, input Recruiting link for it

        News Settings

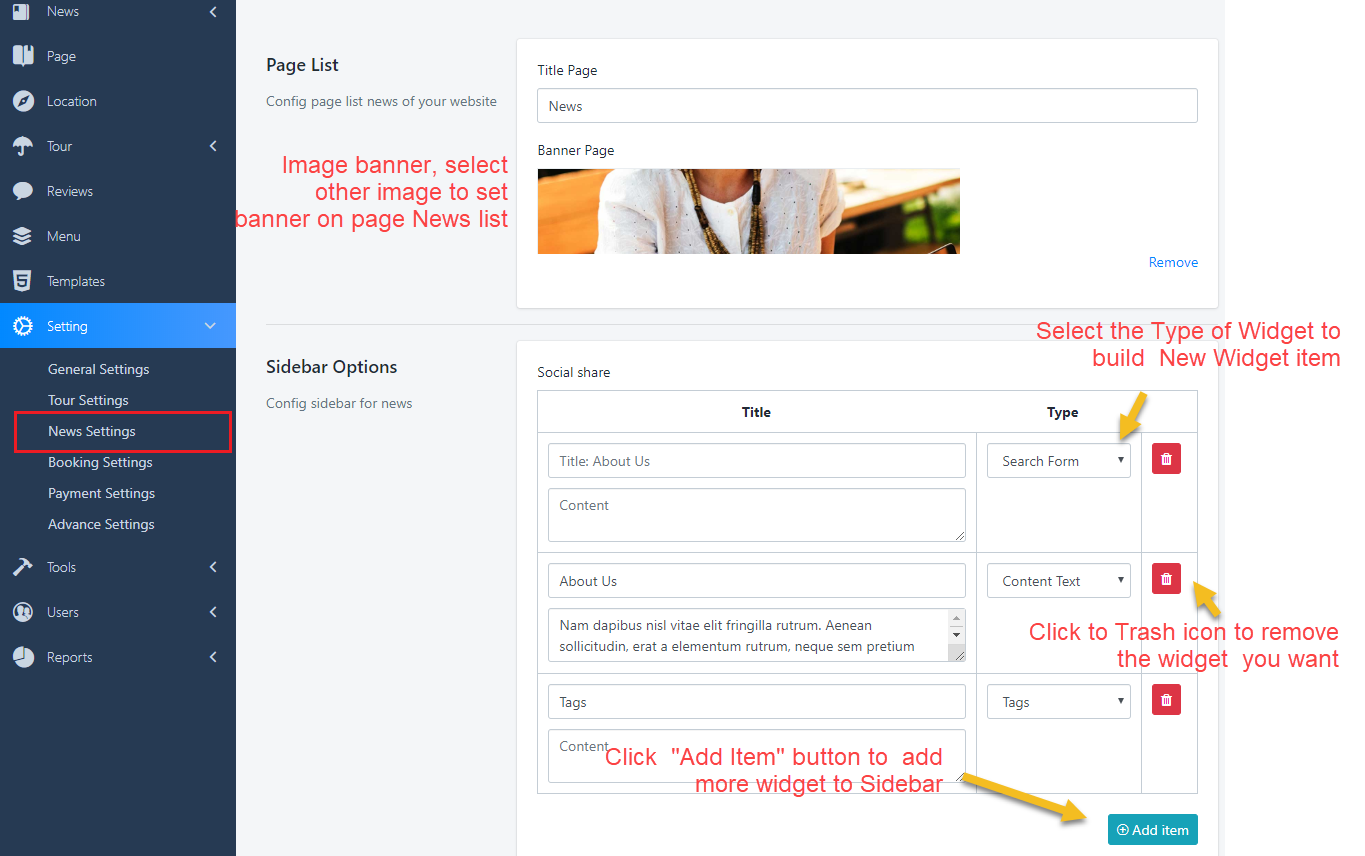
        – News Settings : You can change some information on this Page Setting: Title, image banner, Some Widget on sidebar, check the image below

        - In the current version, we support 5 types for Widget: Search Form, Recent News, Tags, Content Text, Category just need to select the widget you need to adjust your Blog list

        Candidate Settings

        Candidate settings: This provides you with some options that help you adjust layout Search for candidate.

        • Page Title: the text is shown on the banner top
        • Search sidebar: this allow you remove/add new search criteria

        - There are 8 criterias for searching: Keyword, Location, Category, Skill, Education Level, Date Posted, Experience Level, Salary depends on your business to adjust this form

        • Sidebar - Call to action: to enable this section, you need to Input some information like: Banner title, description, image banner, if not the banner will be hidden


        Job Settings

        Job settings: This provides you with some options that help you adjust layout Search for Job.

        • Page Title: the text is shown on the banner top
        • Search sidebar: this allow you remove/add new search criteria

        - There are 8 criterias for searching: Keyword, Location, Category, Skill, Education Level, Date Posted, Experience Level, Salary depends on your business to adjust this form

        • Sidebar - Call to action: to enable this section, you need to Input some information like: Banner title, description, image banner, if not the banner will be hidden


        User Settings

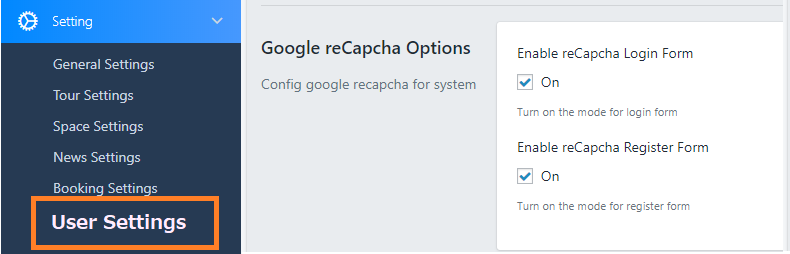
        1. Enable Captcha for Login/Register Form

        Navigate to Dashboard > Settings > User Settings, in this panel you can check/ uncheck to the box to Enable / Disable the Captcha option


        2. Edit Email content

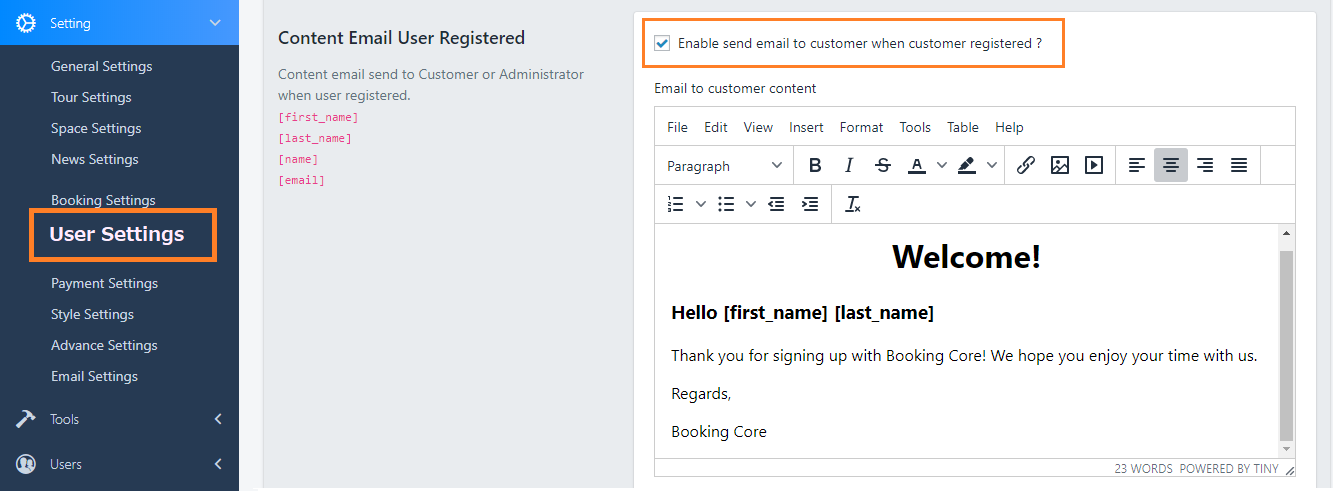
        This is Register email content for User:

        Check to the box if you want to send email to User after registering new account

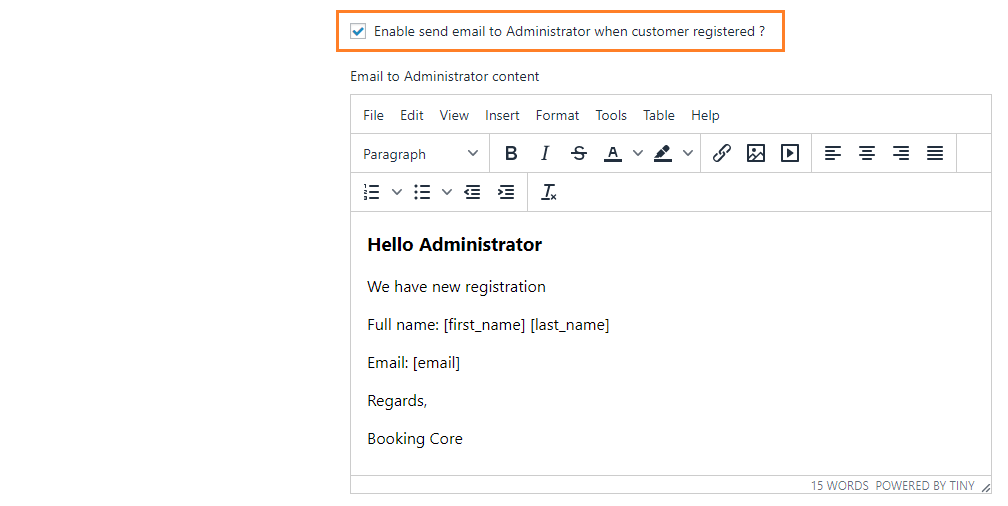
        And this is Notify email to Admin when have new Register, check to the Checkbox to Enable sending email to Admin

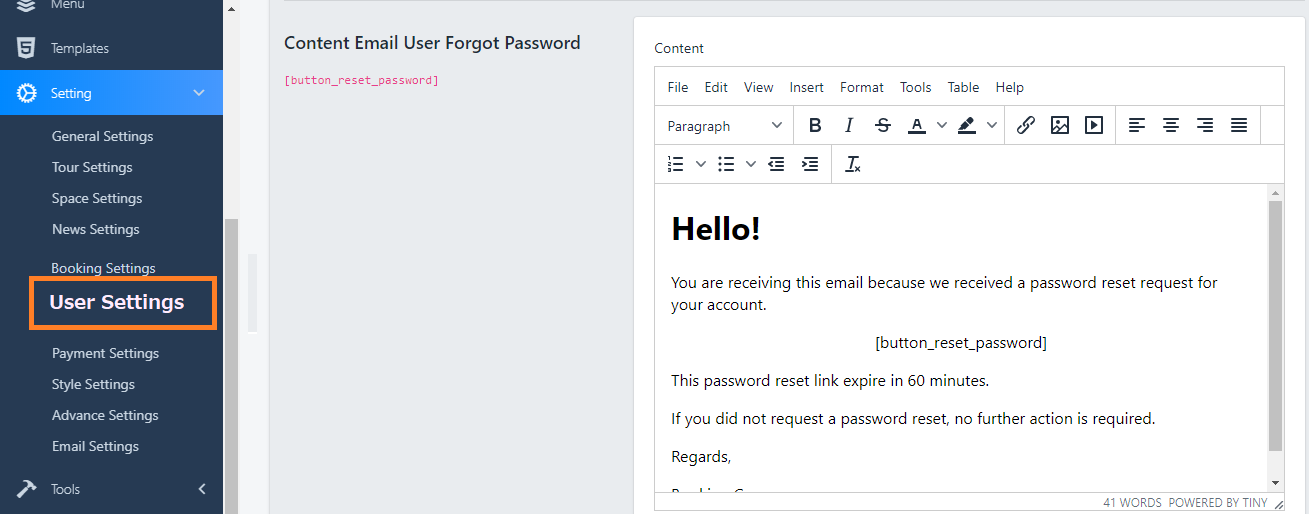
        This is content of Forgot Password, you can change it easy here:

        Styling Settings

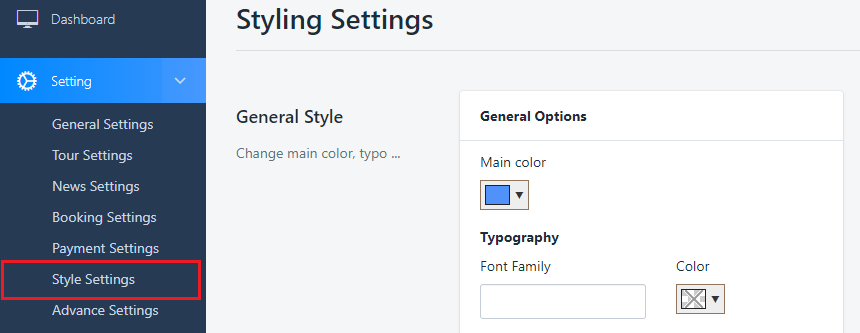
        – Main Color: Select the color you want to set as Main Color for site

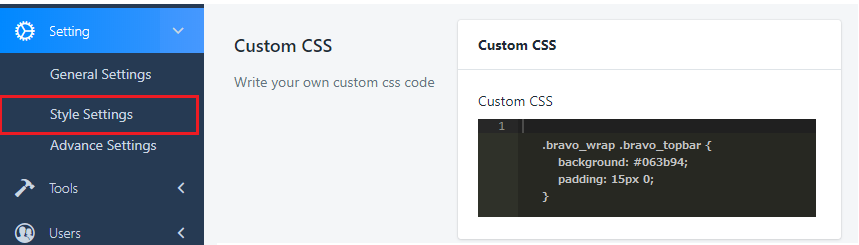
        Custom CSS code: Allows you to enter custom CSS code to make some custom changes in site.

        On the screenshot, we add some CSS code for changing the text on Header.

        If you are developer, this options is quite useful for you

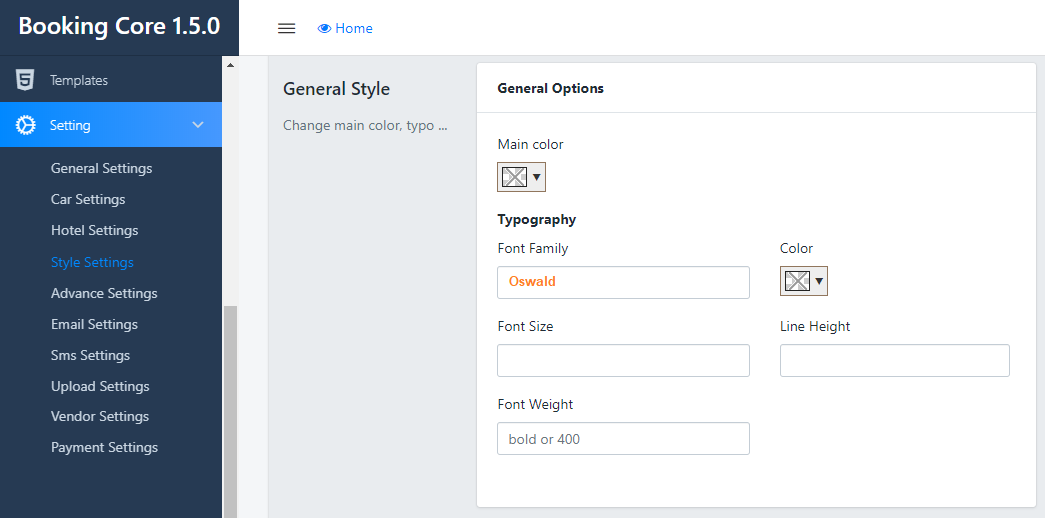
        Change the Google Font

        Font Family: input the font you want to use on the site

        Font Size: input the font size corresponding with the Font Family

        Color: select the color for the site

        Line Height

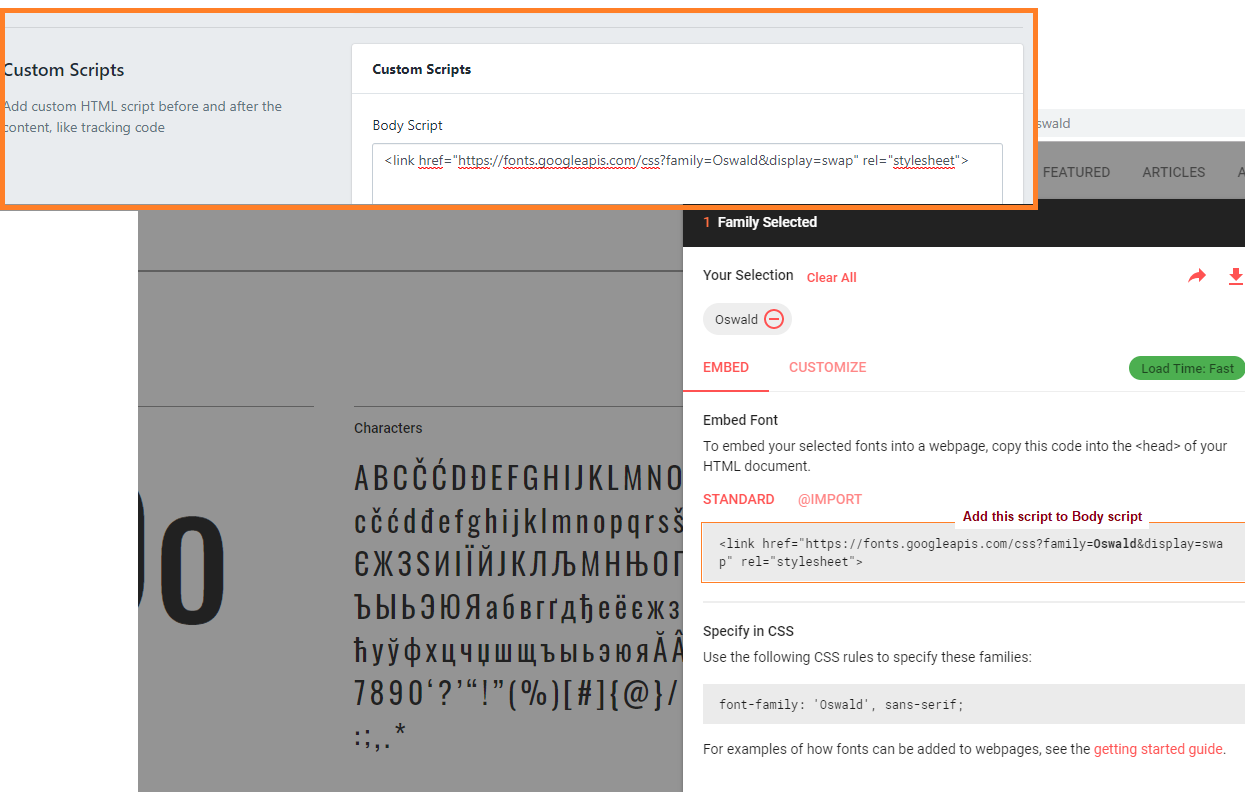
        Add script:

        Advance Settings

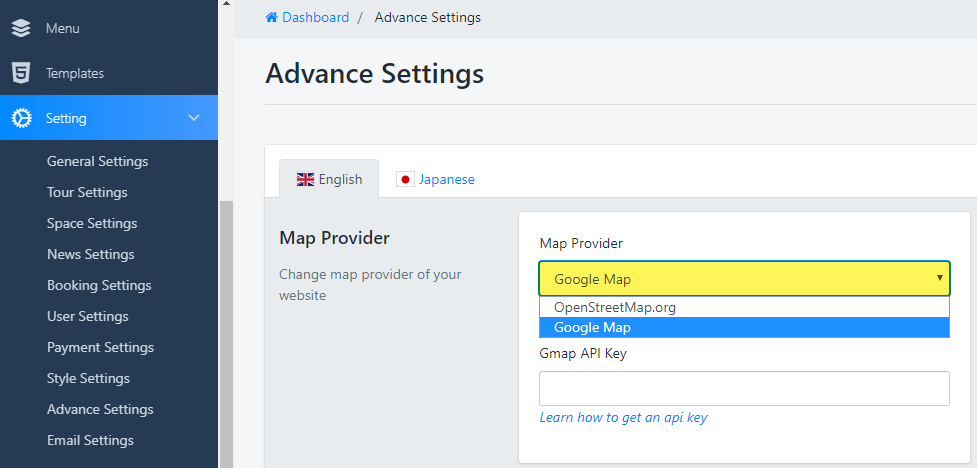
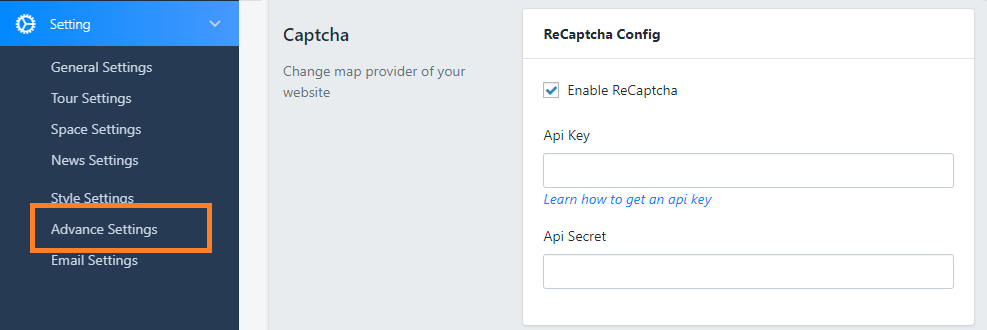
        Go to Settings > Advance Settings > Map Provider: now we support 2 map providers: Google Map and OpenStreetMap.org

        If you use OpenStreetMap.org, you don't need to input any API key, it's free.

        –  Google Map API Key: Enter your google API key to this field

        From June 22, 2016 google no longer support key-less access (any request that not include an API key).  That is reason why the map on your site is missed.

        This post, we will guide you  “How to get Google API for site”?.

        To get Google API, Go to this page to Register your application for Google Maps


        2. Social Login:

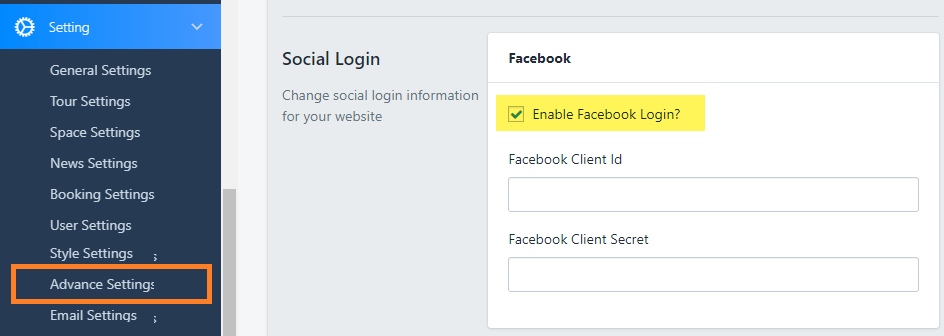
        Navigate to Dashboard > Settings > Advance Settings > Social Login

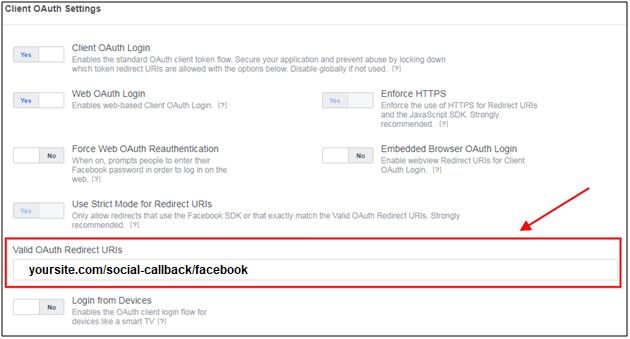
        - Facebook Login: check to the box to allow login by Facebook account, read more in this guide to know how to create FB API

        Make a note of your OAuth Settings

        At the step: Configure the Redirect URI

        Read more here


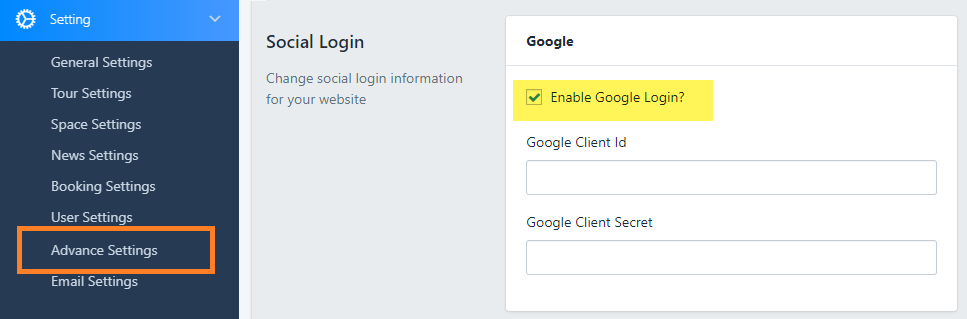
        - Google Login: check to box to enable Login by Google account

        Get a client ID and client secret

        1. Open the Google API Console Credentials page.

        2. From the project drop-down, select an existing project or create a new one.

        3. On the Credentials page, select Create credentials, then select OAuth client ID.

        Remember: In the Redirect URI input, need to use link:yourdomain.com/social-callback/google

        4. Under Application type, choose Web application.

        5. Click Create.


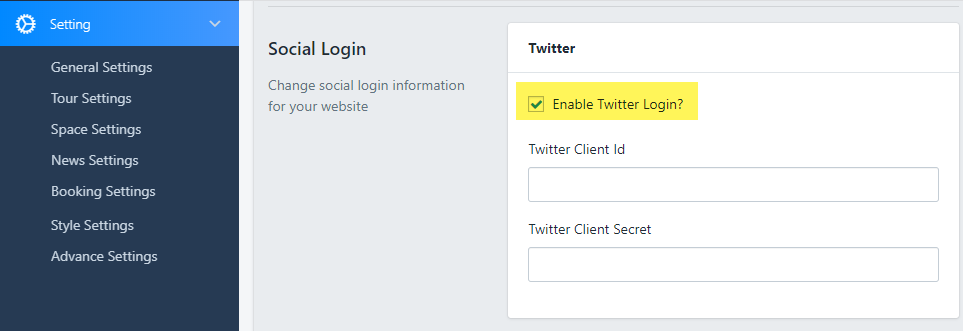
        - Twitter Login: check to the box to allow login by Twitter account

        How to create a Twitter application:

        • 1. Visit the Twitter Developers Site.
        • 2. Sign in with your Twitter Account.
        • 3. Go to “My Applications”
        • 4. Create a New Application.
        • 5. Fill in your Application Details.
        • 6. Create Your Access Token.
        • 7. Choose what Access Type You Need
        • 8. Make a note of your OAuth Settings.

        Remember: In the Redirect URI input, need to use link:yourdomain.com/social-callback/twitter

        Read more here

        Or you can try to watch this video

        - Captcha: check to box to allow Enable captcha in login/register form

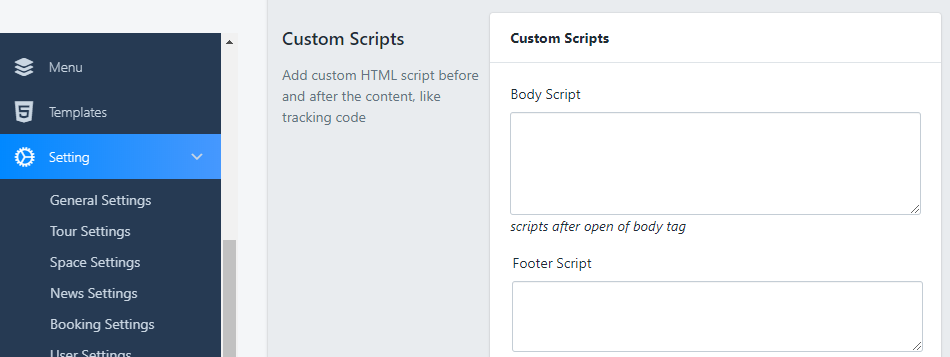
        - Custom Scripts: Add custom HTML script before and after the content, like tracking code

        Email Settings

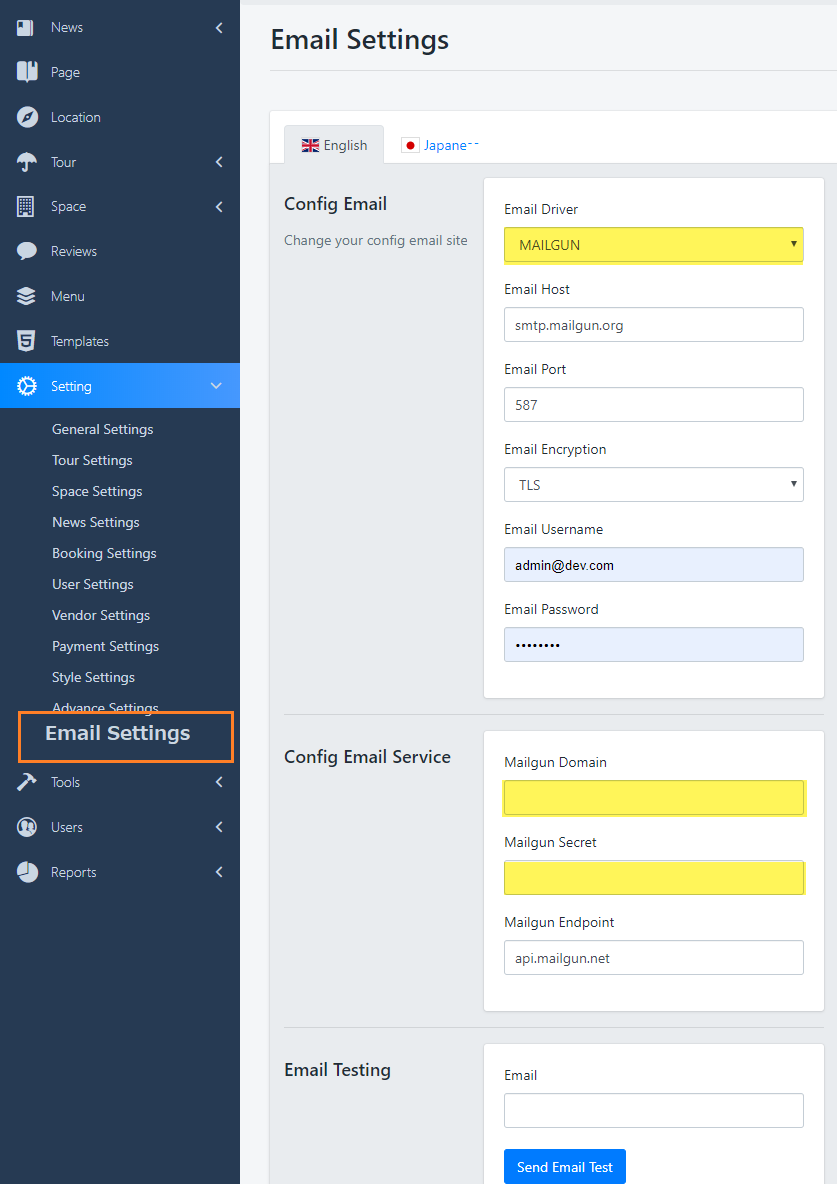
        Now we are supporting 9 mail servers: SMTP, SENDMAIL, MAILGUN, MANDRILL, SES, SPARKPOST, POSTMARK, LOG, ARRAY

        Below is simple guide of Mailgun Config:

        1. Go to this link to get mailgun API key
        2. Scroll down to the Config Email Server, then enter some required informations:

        Email Testing: In case of necessity, you can input the email address into this box to check the mailing activity of your site

        Building Home Page

        Create New Page

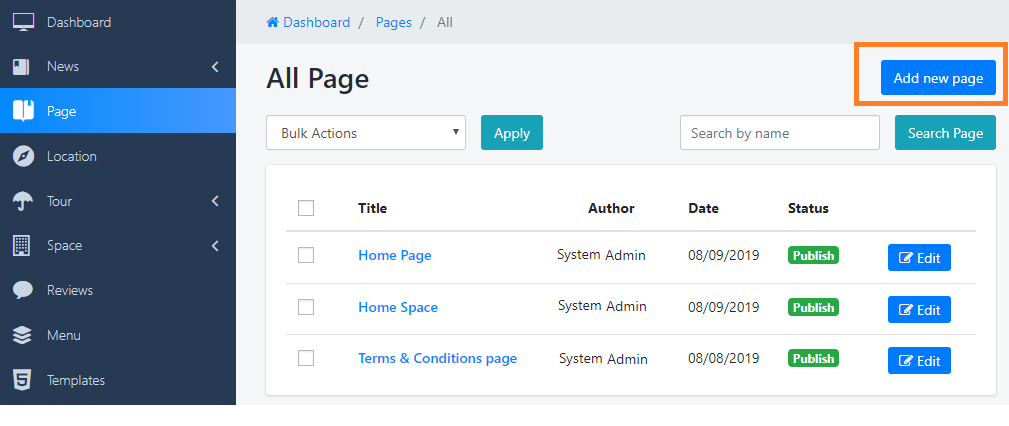
        - Navigate to Dashboard > Page > Add new button

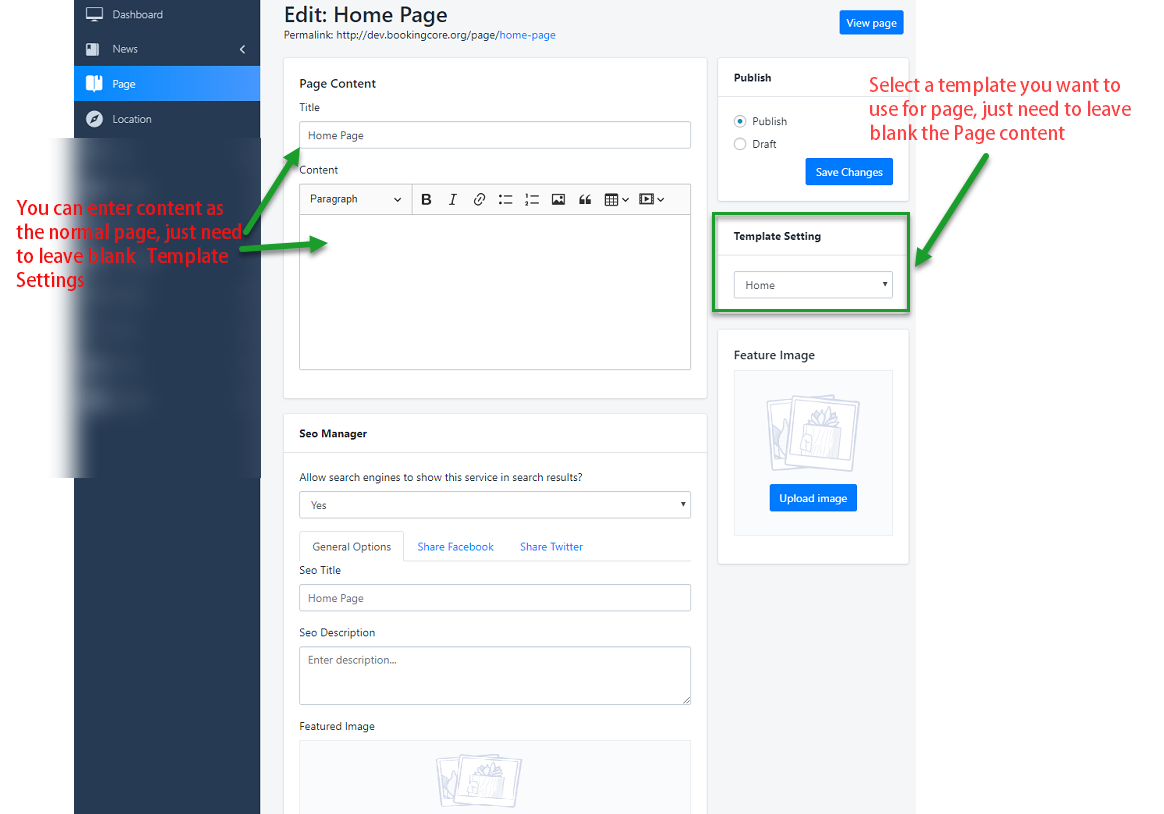
        - For pages you usually just need to enter title and information for the article, not using any particular template.

        Using Template for Page

        The template is built only for specific pages, with lots of information with special styles, see How to build homepage template.

        SEO page is good Feature That makes Google search friendly


        Building Home Page

        Create a template

        To create Front page:

        Step 1: Navigate to Template to build Home page content with Superio Elements

        Step 2: Press to the "+" icon to ADD new Element to the Template

        Step 3: Navigate to Pages > Add new Page


        Step 4: Page Attributes box in right: choose Home template and Save the Page

        Step 5: Navigate to dashboard Settings > General Settings > Home page> Select the page created into the front page.

        View all video here

        Building Home Page

        Contact Manager

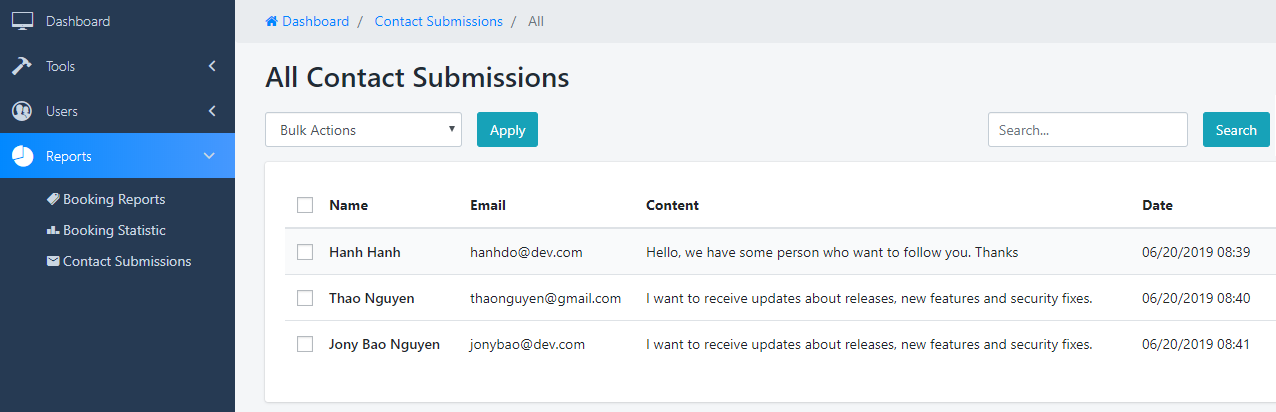
        All email from the Page Contact will be added to this listing, Admin can check and contact to User by his way

        Navigate to Report > Contact Submissions

        Easy to Delete or Search email

        Superio Elements

        Dashboard > Templates > Build Template

        Hero Banner

        This is the way it shows on Home page, there are 3 styles for Banner:

        Banner style 1: In this style, you can upload some additional images for the main photo

        Banner style 2: In this style, there is only 1 additional image for the main photo

        Banner style 3: This is background image normal

        To build this element, go to Template and find Hero Bannerblock, select style for banner, input some information like Title, Sub title..

        With the popular searchfield, just enter words separated by commas, these keywords are for Job searching

        - Input some needy information like Title, Content, button link for the Banner

        Superio Elements

        Dashboard > Templates > Build Template

        Job Categories

        This is the way it shows on Home page, there are 2 styles for list Job category:

        Style 1: The icon image is placed on the left side

        Style 2: The icon image is centered above

        To build this element, go to Template and find Job Categories, select style you need to use, input the Title, sub-title, select the category you need to show in this section

        Superio Elements

        Dashboard > Templates > Build Template

        Job List

        This is the way it shows on Home page, there are 3 styles for list Job:

        Style 1: all job is shown as 2 columns based on the number of the job you need to show

        Style 3: all job is shown as 3 columns based on the number of the job you need to show

        Style 2: all job is shown as 1 column based on the number of the job you need to show

        To build this element, go to Template > find Job list block, select the style you need to use

        - Input some needy information like Title, Subtitle, number of the job you want to show on the list

        - Select Job Categories: you can retrieve the jobs according to the required categories or leave blank if you need to take all

        - Load more URL: this link is for "View more" button, you can input link to any page

        Superio Elements

        Dashboard > Templates > Build Template

        Brand List

        This is the way it shows on Home page

        To build this element, go to Template > find Brand list block select style you want to use on the site

        - Input some needy information like Title, Subtitle, link of the brand you want to show on the list

        You should use image with size 1200x40(px)

        Superio Elements

        Dashboard > Templates > Build Template

        About us block

        This is the way it shows on Home page, there are 2 styles for this section, but they don't have much difference

        Style 2:

        To build this element, go to Template > find About us block select the style you need to use

        - Input some needy information like Title, Content, button link for the Banner

        - You can use the simple HTML code or editor to make the content is more vivid, more eye-catching

        Superio Elements

        Dashboard > Templates > Build Template

        App Download

        This is the way it shows on Home page

        To build this element, go to Template > find App Download block, in this section you need to upload 3 images, 1 featured image size 610x650(px) and 2 button images

        - Input some needy information like Title, Sub title, Description for the Banner

        Superio Elements

        Dashboard > Templates > Build Template

        How It Works

        This is the way it shows on Home page

        Style 1: Normal style

        Style 2: Boxed Style

        The sample content of this section is the Job Application Review Process, there are 3 parts

        To build this element, go to Template > find How It Works block and select the style you need to use

        - Input some needy information like Title, Subtile of section

        - Input content for each part include: Title, Sub Title, Image Uploader

        Superio Elements

        Dashboard > Templates > Build Template

        Candidate Block

        This is the way it shows on Home page

        To build this element, go to Template > find Candidates: List Items block

        - Input some needy information like Title, short Description, number of candidate you need to show on this section

        - Filter by Category: you can select the candidate by category

        Superio Elements

        Dashboard > Templates > Build Template

        Block Counter

        This is the way it shows on Home page, there are 2 styles for Counter section, but they are not much difference

        To build this element, go to Template > find Block Counter block

        - Input some needy information like Count Number, Count symbol, Description for each part

        Superio Elements

        Dashboard > Templates > Build Template

        Block FAQ's

        This is the way it shows on Home page

        To build this element, go to Template > find FAQ's List block then input list Answer & Question

        - Input some needy information like Title, Content, button link for the Banner

        Superio Elements

        Dashboard > Templates > Build Template

        News List item

        To create this section, Go to Dashboard > Templates > Build Template > New: List Items then input some needy informations

        - Input some needy information like Title, short Description, number of news you need to show on this section

        - Filter by Category: you can select the news by category

        Superio Elements

        Dashboard > Templates > Build Template

        List Location

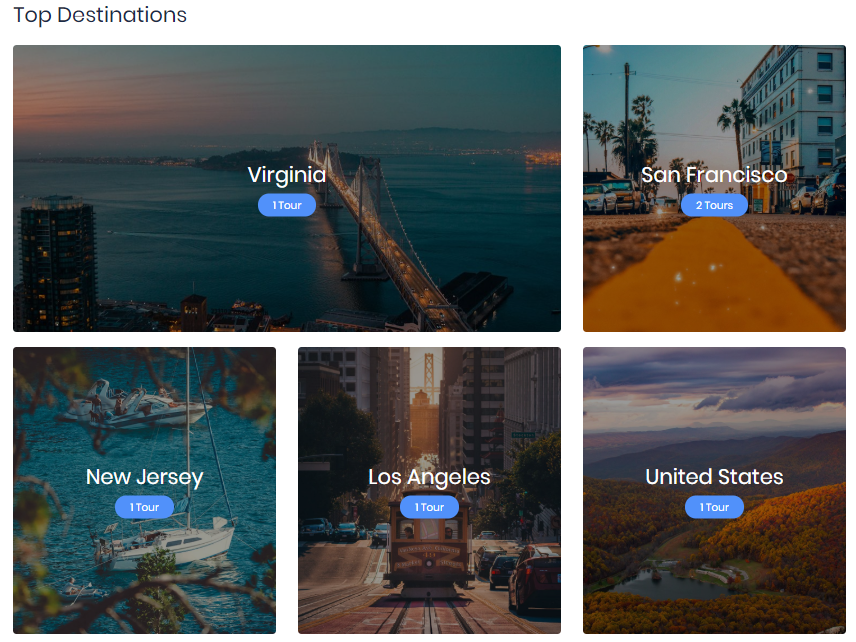
        This is the way Grid Location shows

        This location section will come with the display of Job belonging to each location. Pressing to the featured image, you will be redirected to the job list by this location

        To create this section, Go to Dashboard > Templates > List Location then input some needy informations like Title, short Description, number of news you need to show on this section

        - List Location by IDs: You can select any location you need to show in this section

        Superio Elements

        Dashboard > Templates > Build Template

        Call to Action

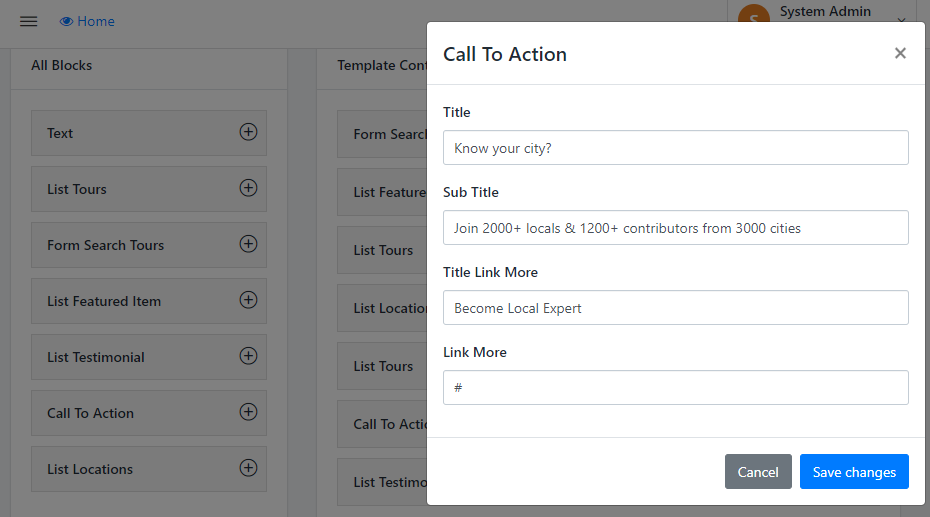
        This section provides information as an offer for customers who want to become Website partners, to build the section, enter some information below:

        • Title: Enter a special title to attract customers' interest
        • Sub-title: Short description of an attractive offer, attractive reasons for ventor

        Superio Elements

        Dashboard > Templates > Build Template

        List Testimonial

        Style 1

        Style 2

        Show as the Row section, there are 3 items per slider. This is Review for your Website, should use the Best Comment. To build this section just need to enter some information below:

        • Step 1: Enter Title of Section
        • Step 2: Press to the ADD NEW to Open form content
        • Enter Title and the User's Comment, Users Name, Position
        • Avatar Image: upload the image size 50x50 (px)
        • After building the Testimonial, Remember to SAVE CHANGE anything before Closing

        Superio Elements

        Dashboard > Templates > Build Template

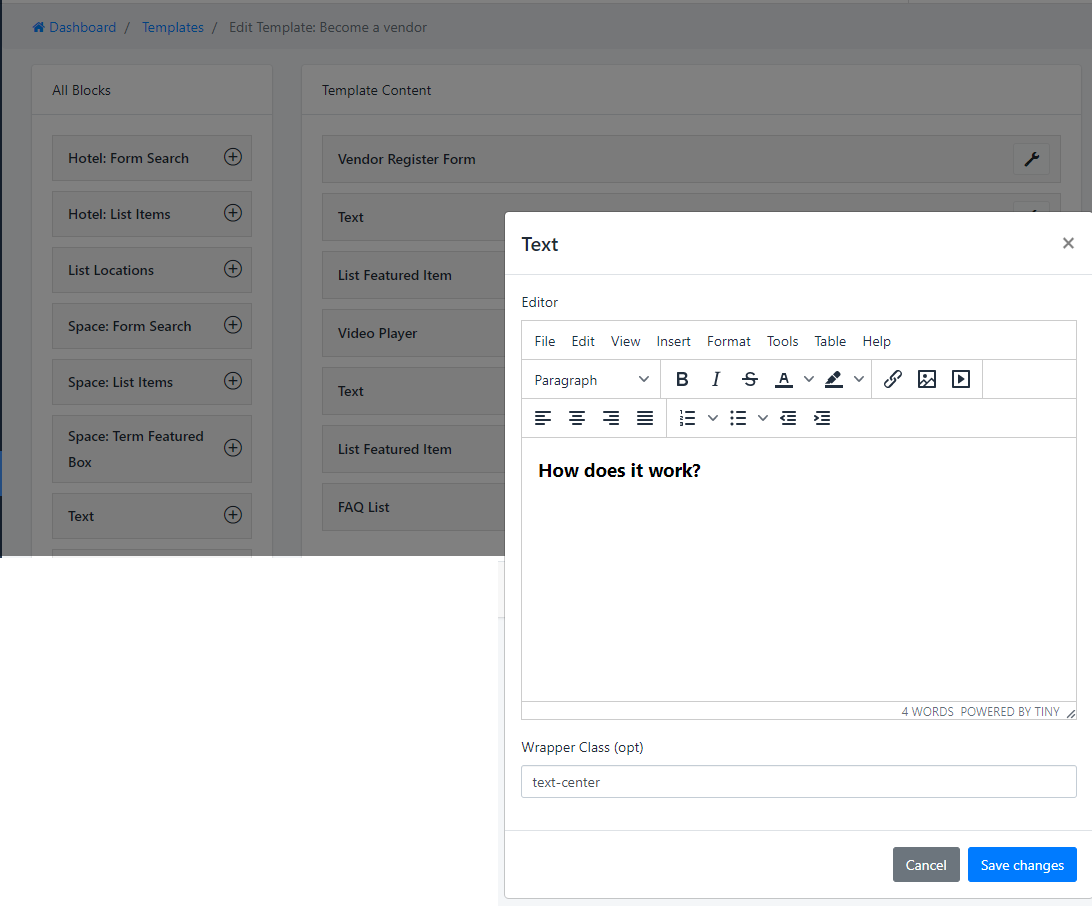
        Text Element

        This element is additions, you can use :

        • Service Styles:
        • Content Align: Right, Center, Left
        • Icon: Icon for the element
        • Title: Name of the service
        • Desc: Description about it

        Pricing table

        Dashboard > Templates > Build Template

        Pricing Table

        This element is additions, you can use :

        GIG manage

        Navigate to Dashboard > GIG, this is the GIG manager. You can do Bulk Action(Delete, Trash) any GIG or Search by any GIG information like Name, Category,...

        Check to the Checkbox of List GIG then in the Bulk Action > Select to "Delete" option and Press Apply to Delete

        Add new GIG

        Navigate to Dashboard > GIG > Add GIG, then Add some information like GIG name, Category, tags..for a new GIGs

        1. Overview

        • Title:Make sure that your title is short, clear, and to the point. Buyers should recognize the type of service that you offer immediately. Try to start with ”I will...”
        • Category : Select the appropriate category and subcategory for your Gig from the drop-down menu. We recommends these based on your title.
        • Tags : Add the words or phrases that best describe your Gig, 10 tags maximum

        2. Scope & Pricing

        • Packages: Describe the details of your offering in the area provided.
          • Name your package: Common names such as: Basic, Standard, Premium..
          • Price: Select a price for your service—ranging from $5, up to the maximum price for the type of Gig
          • Description: Describe the details of your offering in the area provided.
          • Delivery Time: Using the drop-down, select the number of days it will take for you to complete your Gig.
          • Revisions: Using the drop-down menu, select the number of revisions you include in your Gig. This is not mandatory, but it is recommended for Gigs where customization or creation is done.
        • Package Compare:This section allows you to give customers some differences between packages, you can add unlimited different points
        • Add Extra Services(Optional): Select the various items you would like to include in your service (Extras), such as the number of logos to include, the source files, or a high-resolution file. To offer Extras:
          • Gig Extras > Select from the list of items
          • Add Gig Extra > Complete a title (mandatory), amount for this service

        3. Description

        • Briefly Describe Your Gig: some short information to reach customers more easily
        • Frequently Asked Questions: this help customers proactively understand your work and will make it easier to make a decision to buy your GIG. Your FAQs are displayed on your Gig page.

        4. Requirements

        • Requirements: This is where you have the opportunity to tell your buyer what you need from them to start the order using free text, a multiple-choice question, or a file upload as options.
        • REQUIRED: If you tick to this field, this means the customer need to answer all the Requirement to start the job after buying

        5. Gallery

        • Gallery: Use the images with the same size (Recommended image size 800x500 px)
        • Feature Image: click Browse and select an image, Photos can be samples of your work. This image will be shown on the GIG list

        6. SEO Manage

        If you don't need SEO on-site, just need to select No in the selector below:

        Candidate create a GIG

        The service you offer and sell in the marketplace is called a "Gig." Your Gig is an opportunity to showcase your talent to potential customers and to provide them with all the information they may need before they choose to place an order.

        To start to build a GIG, please follow these steps below:

        1. After login to by Candidate role, Click to Hi [Your name] Candidate Dashboard
        2. You will see the GIGs in your panel, Click to Create a GIG
        3. Quite the same with admin, you can follow this guide to create your GIG

        Start selling a GIGs

        Superio is a frame marketplace for digital services. Share your skills with the buyer community—and make money while you're at it! you can be a graphic designer, programmer, content writer, translator, or voice-over artist, .. Post your services to the people who need them

        1. To start selling:

        1. Ensure that your seller account is valid
        2. Ensure that you have created your GIGs listing with the Offering packages
        3. Upselling - Monetizing your Gig: Maximize your revenue by upselling your Gig using Gig extras before, during, and after an order.

        2. Receiving an Order

        Once your Gig has been approved, you are officially eligible to start receiving orders! You can expect to receive a notification for each new order made by a buyer. The email is sent every time you receive an order. To view an order:

        1. Once you have successfully logged in, from the menu, click GIG Order. On the top right-hand side of the page, you can see all your active orders.
        2. To view the details of each order, click View. You will then see the Order Page. Here, you can see all the details relating to the order, including the order number, the buyer's information, and history, the date, and time of the expected delivery, and so on.
        3. If you would like to add a private note to the order, be sure to click on Add note. Here, you can write specific details or tasks related to the order.
        4. In the Order Requirements section, click Show requirements to display the information you require from your buyers to start working on the order.

        Company manage

        Navigate to Dashboard > Company, this is the Company manager. You can do Bulk Action(Delete, Trash) any Company or Search by any Company information like Name, Category,...

        Check to the Checkbox of List Company then in the Bulk Action > Select to "Delete" option and Press Apply to Delete

        Add new Company

        Navigate to Dashboard > Company > Add Company, then Add some information like Company name, E-mail..for a new Company

        • Title, Content, and needy pieces of information: Use a good name and description for Company will help Google find you easier
        • Categories: Select company category
        • Employer : select the Employer from the dropdown list, This option for admin only
        • Team size: select your team size, this support searching
        • Logo: Image Size Optimal 330x300(px)
        • Social Media: we are supporting 6 socials media, input to the field you need to use
        • Company Location: input the location information and set your location on geographic coordinate
        • Map Engine: just need to mark the point of Location in the Map, the Long&Lat information will be generated, Zoom default is 12
        • Search Field in GMap: try to input some text to search the Location you want instead of moving the Mark

        Attribute

        Navigate to Dashboard > Company > Attributes to see Panel manage. And just need to enter Name of Attributes => press to Add New button, new Attribute will be created

        After creating, you have to go to Manage Term of that Attribute by Press to Manage Terms to add more Term for Attribute

        Job manager

        Navigate to Dashboard > Job, this is the Job manager. You can do Bulk Action(Delete, Trash) any Job or Search by any Job Information like Name, Category, Author...

        Check to the Checkbox of List Job then in the Bulk Action > Select to "Delete" option and Press Apply to Delete

        Add new Job

        Navigate to Dashboard > Job > Add Job, then Add some information like Job Title, Description..for a new Job

        • Job Featured: set Featured job, this option for admin only
        • Job Urgent: check to this box if your job is in Urgent status
        • Category: assign a category for the job, this is better for searching. You can adjust this listing in the Category at the Left menu

        Next step: input the needy pieces of information

        • Job Type: choose the type for this job(this list is added in the Job types at the Left menu)
        • Job Skills: select all the skills you need for this job(this list is added in the Skill at the Left menu)
        • Expiration Date: When is the application deadline for this job?
        • Hours: input the number of hours worked at your company, you can enter the number of hours by day, week, month or year
        • Gender: Select the gender for this job
        • Salary: enter the salary amount at your company, you can enter the amount for each day, week, month, or year
        • Experience:How experienced do you need a candidate (in years)?
        • Company: assign the company for this job(this list is added in the Company at the Left menu)
        • Location input the location information and set your location on geographic coordinate
        • Map Engine: just need to mark the point of Location in the Map, the Long&Lat information will be generated, Zoom default is 12
        • Search Field in GMap: try to input some text to search the Location you want instead of moving the Mark

        Job Type

        Navigate to Dashboard > Job > Job Type to see Panel manage. And just need to input Job type title => press to Add New button, new type will be created

        All Applicants

        Navigate to Dashboard > All Applicants, this page is for managing all the Candidate's apply

        You can do Bulk Action(Approved, Reject) any Applicants or Search by any Applicants Information like company, Candidate, Job...

      Category manager

      Navigate to Dashboard > Category, this is the Category manager. You can do Bulk Action(Delete, Trash) any Category or Search by any Category information like Name, Category, Author...

      Check to the Checkbox of List Category then in the Bulk Action > Select to "Delete" option and Press Apply to Delete

      Skill manage

      Navigate to Dashboard > Category, this is the Category manager. You can do Bulk Action(Delete, Trash) any Category or Search by any Category information like Name, Category, Author...

      Check to the Checkbox of List Category then in the Bulk Action > Select to "Delete" option and Press Apply to Delete

        Candidate manager

        Navigate to Dashboard > Candidate, this is the Candidate manager. You can do Bulk Action(Delete, Trash) any Candidate or Search by any Candidate Information like Name, Category,...

        Check to the Checkbox of List Candidate then in the Bulk Action > Select to "Delete" option and Press Apply to Delete

        Add new Candidate

        Navigate to Dashboard > Candidate > Add Candidate, then Add some User information like name, e-mail..for a new Candidate

        • User information: input the email, fistname, lastname, phone number, birthday for Candidate
        • User status: You need to set some required information like Status, Role, allow searching option to Publish this Candidate
        • Avatar: upload the image size 90x90 px to set the User avatar
        • Biographical: input some candidate biographical

        Candidate information:

        • Candidate title: Use a good name for title will help employer find you easier
        • Expected Salary: Enter the candidate's desired salary
        • Experience: input the candidate's experience
        • Education Level: select your education level
        • Language: you can input English, German, Russian..
        • Video Url: enter the youtube video link to introduce yourself(Optional)
        • Gallery: upload featured images of your activities
        • Location: input the location information and set your location on geographic coordinate
        • Map Engine: just need to mark the point of Location in the Map, the Long&Lat information will be generated, Zoom default is 12
        • Search Field in GMap: try to input some text to search the Location you want instead of moving the Mark

        The Candidate's Education - Experience - Award

        This is the way it shows

        So, you need to input some information like Time, Location, Reward, More Information

      Location Manage

      Dashboard > Location

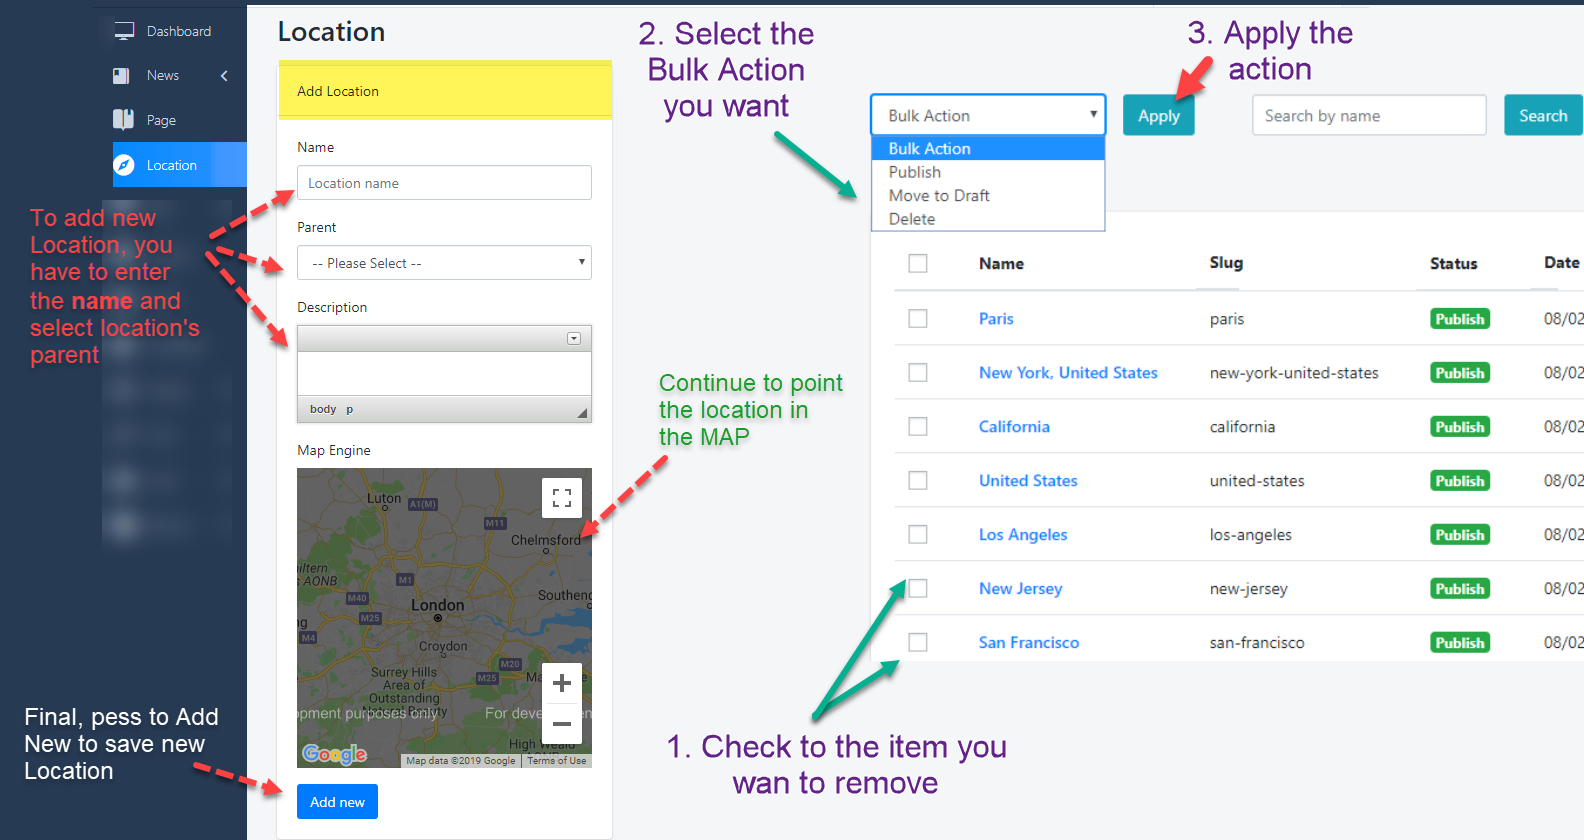
      You can create a location directly in the control panel

      1: On Left panel you can see the form that use to create new Location => Add new Location

      Just need to enter the Location Name, select Parent(Optional), Mark to the Map Engine then Add New

      2: On the Right Panel is list Location, you can manage it easy, do Bulk Action(Approved, Pending, Spam Delete, Trash) any review or Search by Location name


        Register New Candidate

        Open the register form, you will see the Candidate button, just need to input your email and password

        Then comlete your account information in the next step

        Register new Candidate

        Complete Your profile

        After registering new account, you need to go to your profile and input all your information as the screenshot below:

        • User information: input your email, fistname, lastname, phone number, birthday
        • User status: You need to set some required information like Status, Role, allow searching option to Publish your information
        • Avatar: upload the image size 90x90 px to set the User avatar
        • Biographical: input your biographical

        Candidate information:

        • Candidate title: Use a good name for title will help employer find you easier
        • Expected Salary: Enter the your desired salary
        • Experience: input the your experience
        • Education Level: select your education level
        • Language: you can input English, German, Russian..
        • Video Url: enter the youtube video link to introduce yourself(Optional)
        • CV Uploaded: upload your CV to complete the Profile, If you have no cv files, you can't apply any job
        • Gallery: upload featured images of your activities
        • Location: input the location information and set your location on geographic coordinate
        • Map Engine: just need to mark the point of Location in the Map, the Long&Lat information will be generated, Zoom default is 12
        • Search Field in GMap: try to input some text to search the Location you want instead of moving the Mark

        The Candidate's Education - Experience - Award

        This is the way it shows

        So, you need to input some information like Time, Location, Reward, More Information

        Candidate Dashboard

        My Applied

        On the Job listing, you will see the Apply for Job button, you need to input some information like Your messages, select your CV and the Terms

        After submiting, your history will be saved in My Apllied:

        Candidate Dashboard

        My Contact

        Now, your profile will be looked like this: https://superio.bookingcore.org/candidate/ui-designer-at-invision-1

        From the left-side, you can see the contact form, it looks like this:

        Employers or anyone interested can contact you through this form. And all the this is saved in Your dashboard:

        Register New Employer

        Open the register form, you will see the Employer button, just need to input your email and password

        Then comlete your account information in the next step

        Company profile

        After registering new account, you need to go to your profile and input all your information as the screenshot below:

        • Title, Content, and needy pieces of information: Use a good name and description for Company will help Google find you easier
        • Categories: Select company category
        • Team size: select your team size, this support searching
        • Logo: Image Size Optimal 330x300(px)
        • Social Media: we are supporting 6 socials media, input to the field you need to use
        • Company Location: input the location information and set your location on geographic coordinate
        • Map Engine: just need to mark the point of Location in the Map, the Long&Lat information will be generated, Zoom default is 12
        • Search Field in GMap: try to input some text to search the Location you want instead of moving the Mark

        Company Job

        Navigate to Dashboard > Job > Add Job, then Add some information like Job Title, Description..for a new Job

        • Job Urgent: check to this box if your job is in Urgent status
        • Category: assign a category for the job, this is better for searching. You can adjust this listing in the Category at the Left menu

        Next step: input the needy pieces of information

        • Job Type: choose the type for this job
        • Job Skills: select all the skills you need for this job
        • Expiration Date: When is the application deadline for this job?
        • Hours: input the number of hours worked at your company, you can enter the number of hours by day, week, month or year
        • Gender: Select the gender for this job
        • Salary: enter the salary amount at your company, you can enter the amount for each day, week, month, or year
        • Experience:How experienced do you need a candidate (in years)?
        • Company: assign the company for this job(this list is added in the Company at the Left menu)
        • Location input the location information and set your location on geographic coordinate
        • Map Engine: just need to mark the point of Location in the Map, the Long&Lat information will be generated, Zoom default is 12
        • Search Field in GMap: try to input some text to search the Location you want instead of moving the Mark

        All Applicants

        Navigate to Dashboard > All Applicants, this page is for managing all the Candidate's apply

        You can do Bulk Action(Approved, Reject) any Applicants or Search by any Applicants Information like company, Candidate, Job...

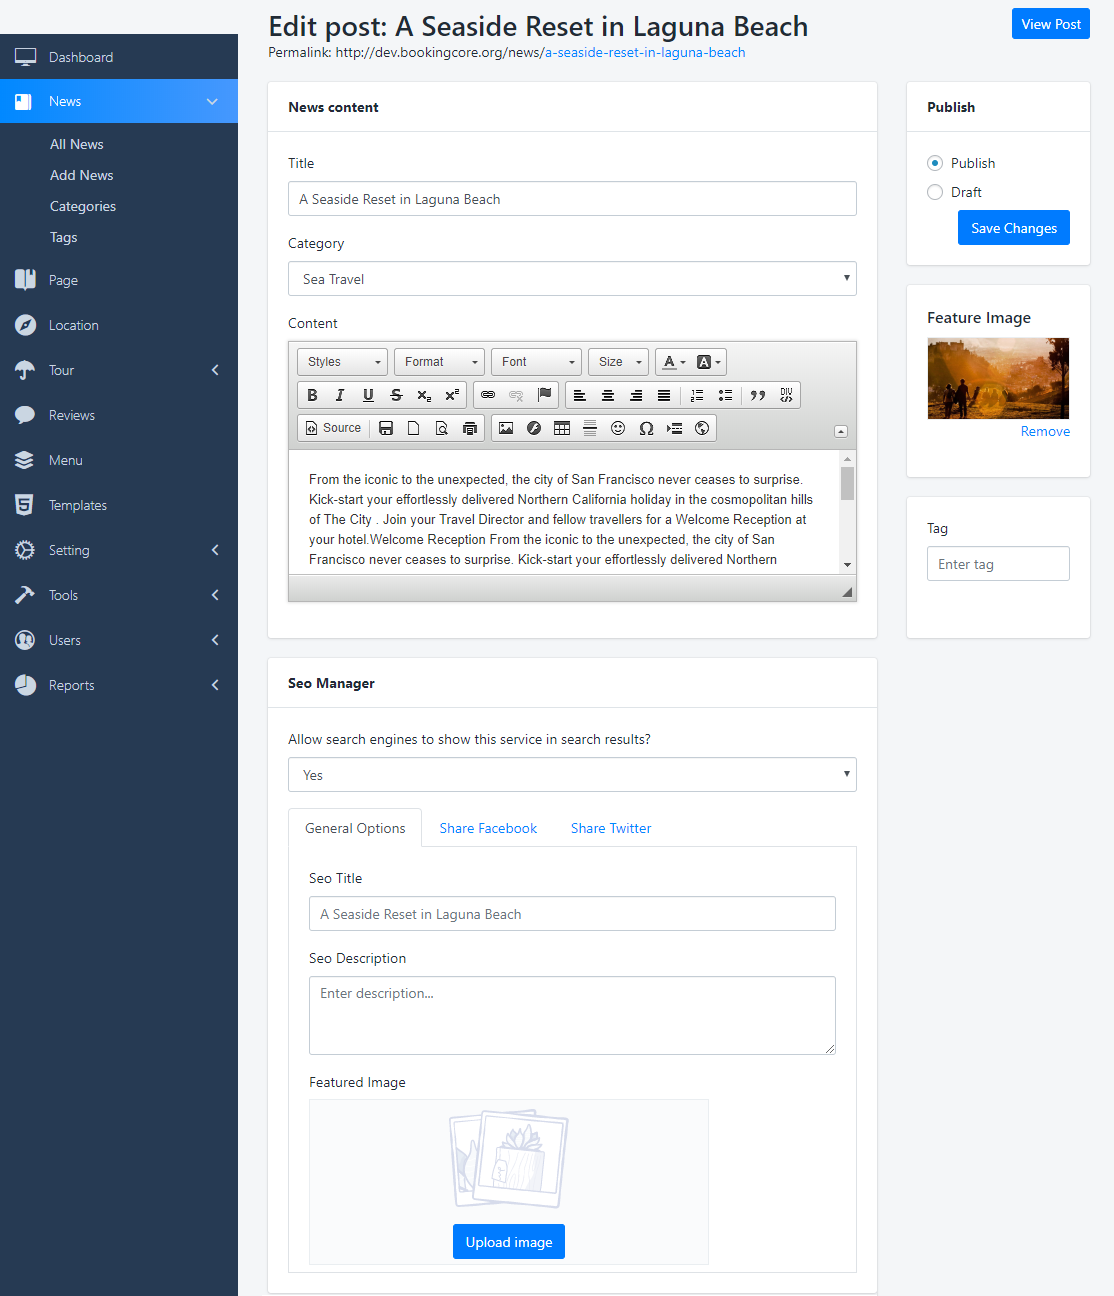
        Creating Blog Posts

        Steps to Create A Blog Post:

        Step 1 – In your Dashboard, go to Posts, Add New

        Step 2 – Enter the post’s title and content in the editing field.

        Step 3 – Add Categories: To assign it to the post, check the box next to the Category name.

        Step 4 – Add Tags: Type the words to be tagged, separate multiple tags with commas.

        Step 5 – Choose Featured image: click “Set Featured Image” then choose a image for your post.

        Step 6 - SEO post: Leave blank if you want to use Default Information to SEO

        Step 7 – When you have finished, click Publish to save and publish the post.

        User management

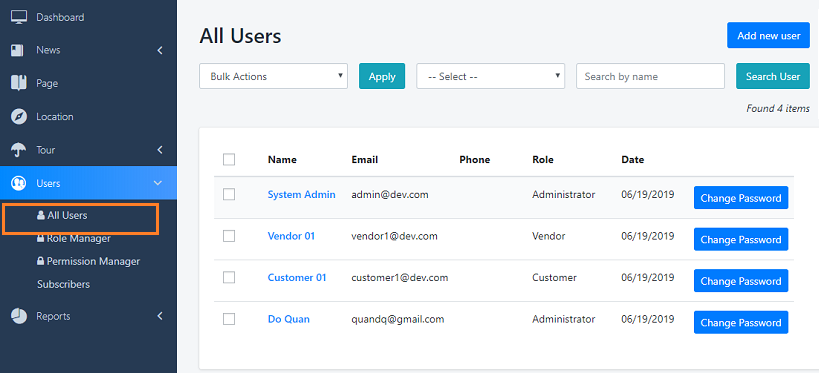
        Dashboard > Users > All User

        Users are people who use services provided by customers and each user can have Role limitations. Customers can create, modify and delete users but the owner is the subscriber who is also the owner of these customers. To separate users among customers of one subscriber, user prefix is used.

        1. Easy manager and create new user.

        2. Change Password


        Roles management

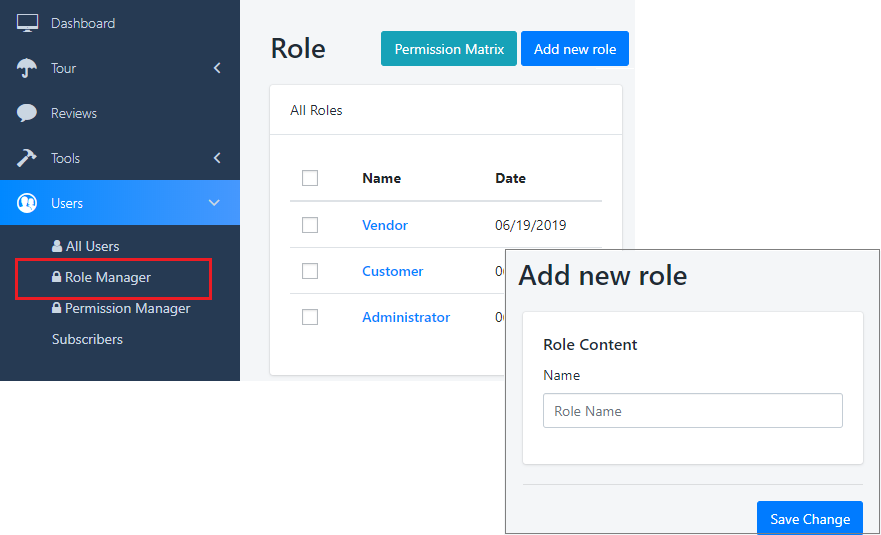
        Dashboard > Users > Role Manager

        Create New Role

        This panel is Role listing, Admin can create new Role easy, just need to enter its name.

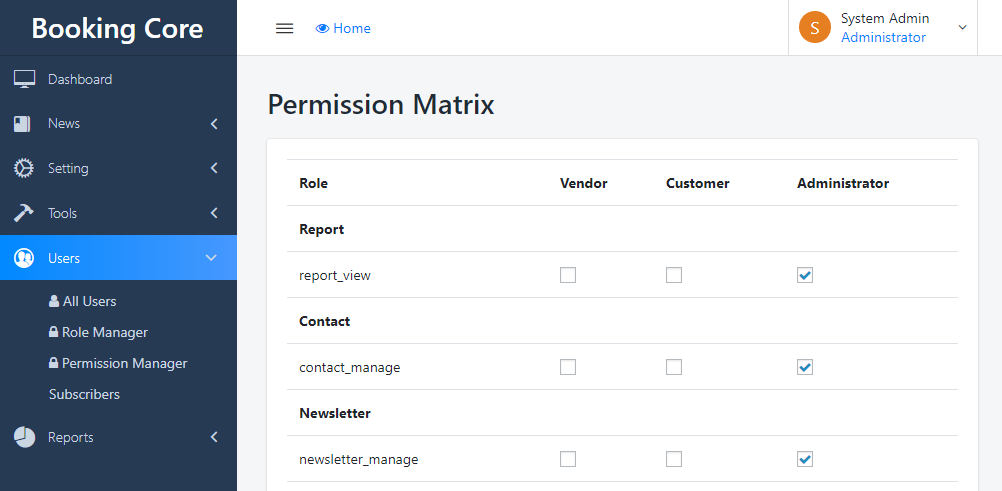
        After create the Name of ROLE, see the Permission Matrix button

        Check to the Permission you want to share to User Role

        Contact manage

        Languages manage

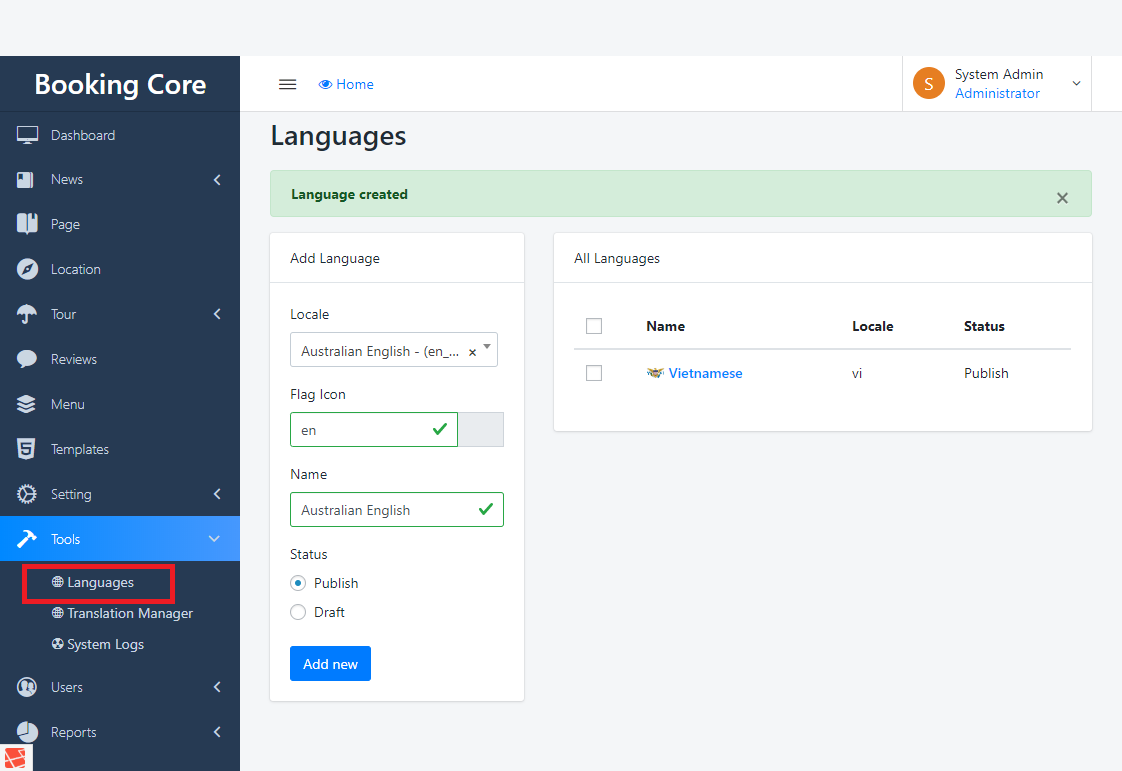
        The First Step to build Multi-language is Create the Language for site, navigate to Dashboard > Tools > Language

        to see the Language Panel

        1. Select the Language you want to add

        2. Enter the Flag code of language, you can find more here

        3. Press to Save button to build

        Translations Manager

        All our Booking System are translation-ready which means that you can easily translate them into any language you want. Here are some instructions:

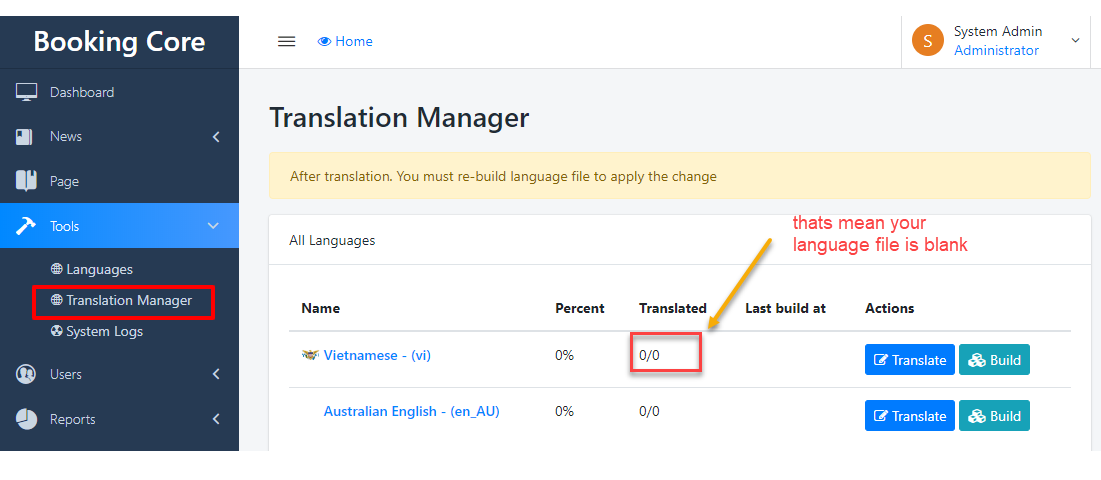
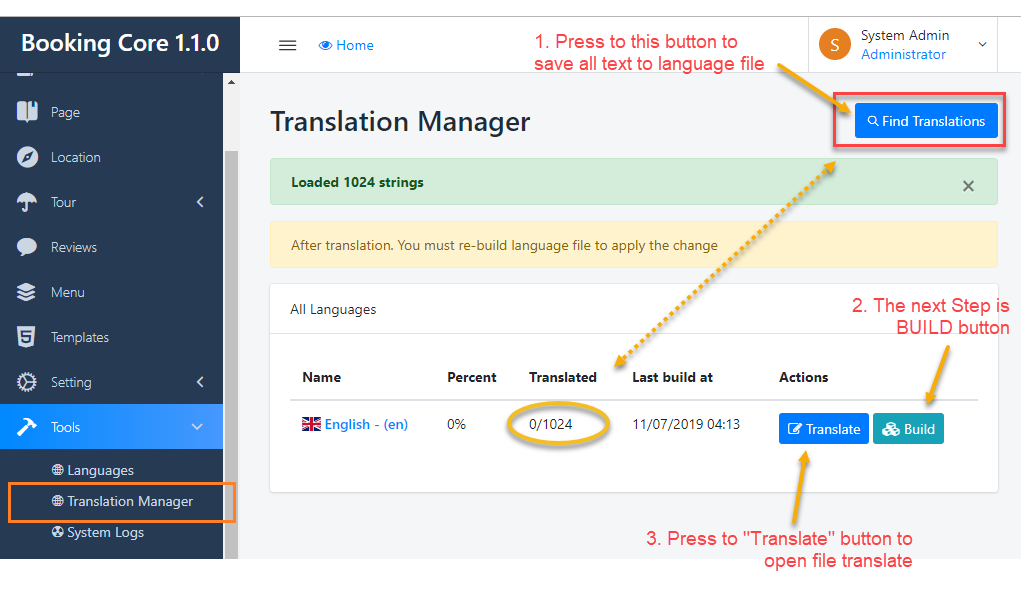
        Firstly, navigate to Dashboard -> Translation -> Site language, see the Translated column, its 0/0. That's mean your site is empty.

        Secondly, START Build language file

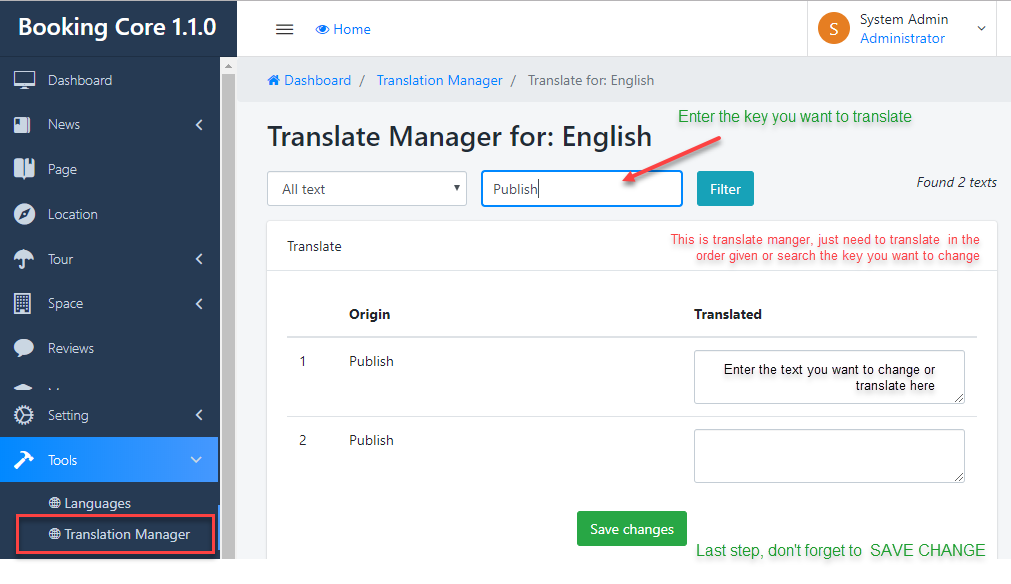
        Thirdly, press to Translate button, to START translate file

        - In the Translation Page: just need to translate in the order given or search the key you want to change

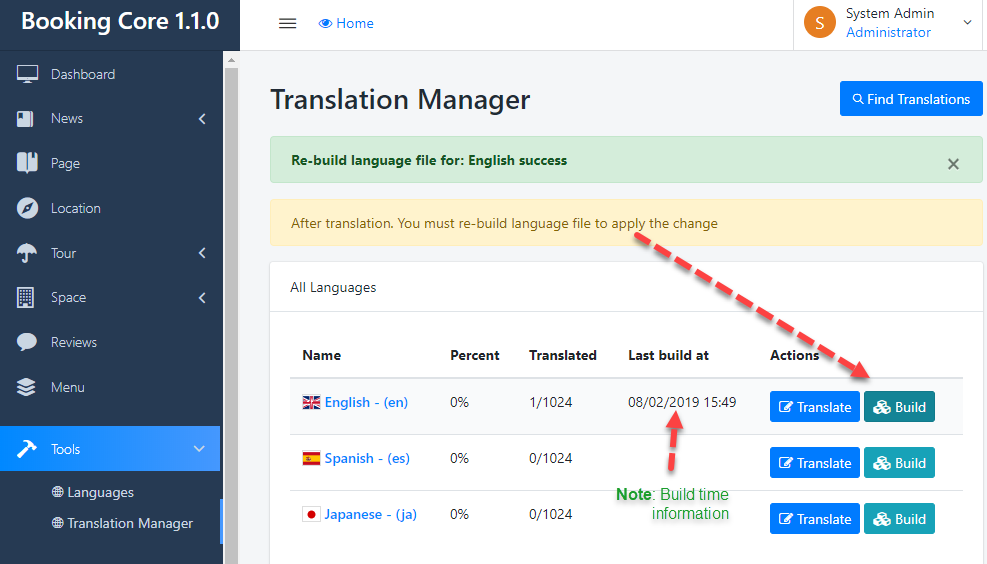
        Fourly, Build language file:

        - Back to Translate Manager Page, then BUILD file Once again

        The Final: Set language for site

        Navigate to Settings > General Settings > Language this is REQUIRED step, Select the main language to Apply the change.

        Multi-languages

        From version 1.2, our Superio system is ready for multi-language features, which means you can easily use multiple languages on your website. Here are some guidelines:

        1. Enable Multi-Language

        Firstly, navigate to Dashboard -> Settings -> General Settings -> Language :

        1. Select Main language: This is an important step for building your website content. Because sub-languages are only recompiled from the main language, if you are using EN as the primary language and suddenly switch to JA, your website will be failed. Because no main-content of JA to use.

        2. The next step, Enable Multi languages: Check to the box to Enable Multi-languagesfor site

        Multi-language for Company

        3. After activate the Multi-languages you will see your website has Language bar


        2. Start translate for site

        We will start the example for Company, there are 3 steps to complete: Company content, company attribute, and company Block on homepage

        1. Company Content

        The language bar only appears when updating an existed Company, which means you won't be able to create a language from the first Company creation.

        This is the Company content of the sub-language (Japanese), there will be some hidden content such as Images sections(Featured image, Gallery, video ..), the price section ..that have been set in main language.

        In sub-languages, you can only translate content that is textual

        Multi-language for Company


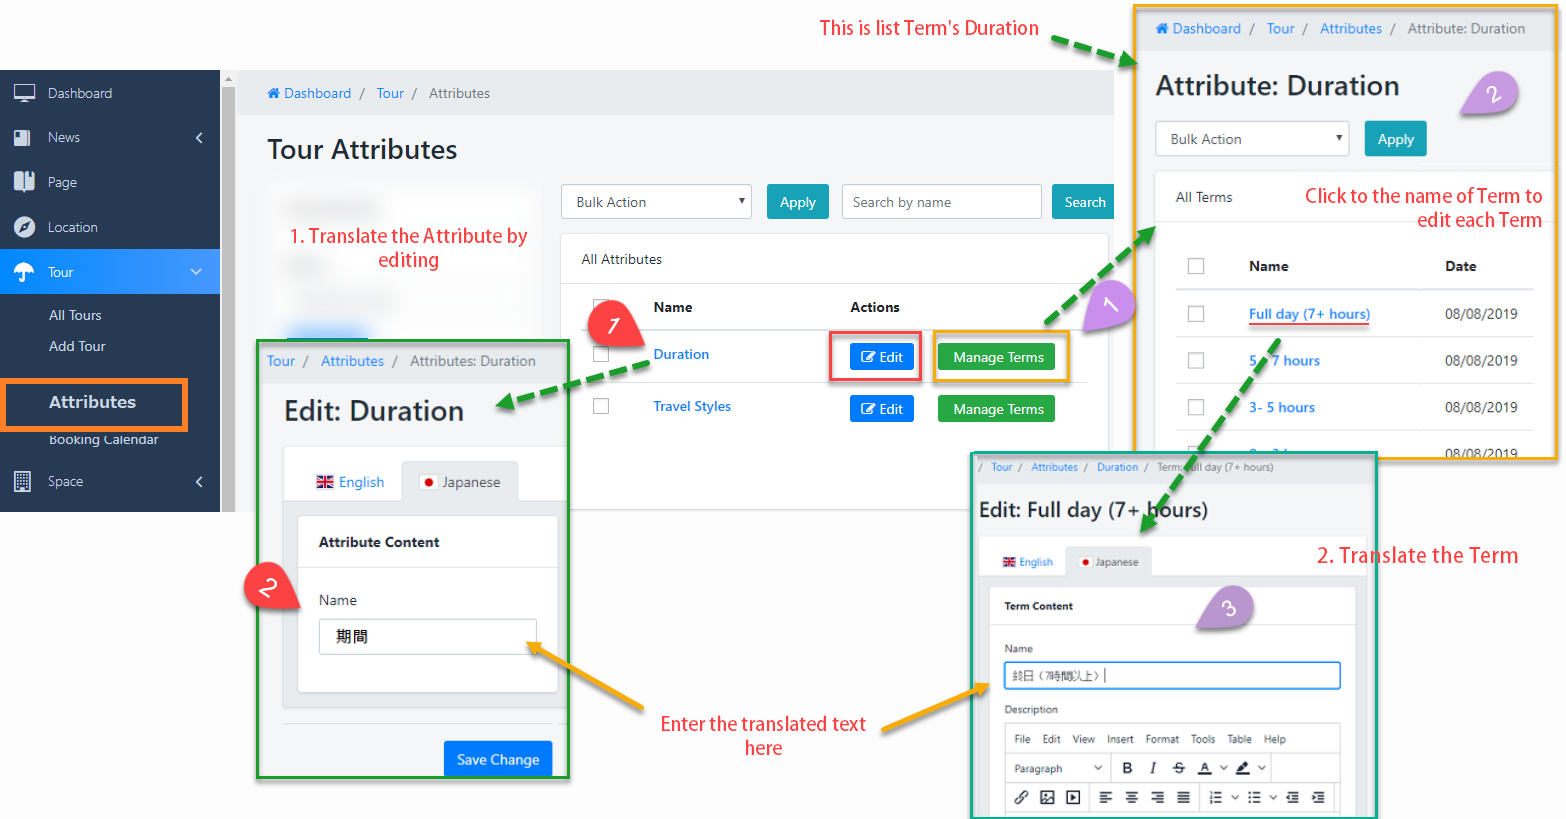
        2. Company Attributes

        The law of multilingual is only able to translate the available content, as well this is the Company's Attribute Management Part

        In the Company Attributes, there are 2 things need to clearly:

        1. Multi-language for Attributes

        - Click to edit button or Name of Attribute to go to edit page

        - Navigate to the Sub-Language tab and do translate

        2. Multi-language for Term's attribute

        - Click to Term Manager of duration respectively to view list term

        - Click to the Term's name to edit it

        - Navigate to the Sub-Language tab and do translate

        Multi-language for Company


        3. Company Block of Homepage

        Multi-language for Company


        4. Translate Superio script click here to know..

        Thank you for used our product Superio

        Released: 20 September 2021

        Made by: BookingCore Team  

        Get support at: Facebook community

        Request and Vote Features you want on Booking: Check it here

        We are one of the strong teams in developing Online Booking system, trusted by over 10,000 customers. However, we are also looking forward to the positive feedback as well as the contributions to build a perfect Booking system.

        We would like to express our sincere thanks to our customers , who are companions and stick with us all the way ahead.

        Cordially greet and to win!


    © Copyright 2019, Bookingcore Team.